
Hello friends, welcome back to my blog. Today in this blog post, I am going to show you, Vuejs – Vue 3 Firebase Crud Tutorial Working Demo.
Guy’s with this post we will learn below things:
- Vue 3 Firebase Crud Tutorial.
- Vue 3 Routing with parameter and dynamic routing.
- Add Bootstrap 5 in Vue 3.

Vue3 and Bootstrap 5 came and if you are new then you must check below two links:
Friends now I proceed onwards and here is the working code snippet and use this carefully to avoid the mistakes:
1. Firstly friends we need fresh vue 3 setup and for this we need to run below commands . Secondly we should also have latest node version installed on our system. With below we will have vue router, firebase, bootstrap 5(optional, if you don’t want then you can skip this) modules in our Vue 3 application:
npm install -g @vue/cli

vue create vuecrud

cd vuecrud

npm i vue-router@next

npm i firebase

npm i bootstrap

npm run serve //http://localhost:8080/
2. Now guy’s we need to create AddStudent.vue file inside vuecrud/src/components folder and add below code inside it:
<template>
            <div class="pt-3 pb-2 mb-3 border-bottom">
            <h1 class="h2">Add Student</h1>
            <p class="custom-text"><strong>therichpost.com</strong></p>
        </div>
            <form @submit.prevent="onFormSubmit">
                <div class="mb-3">
                    <label for="firstName" class="form-label">First Name</label>
                    <input type="text" class="form-control" v-model="user.firstName" required>
                </div>

                <div class="mb-3">
                    <label for="lastName" class="form-label">Last Name</label>
                    <input type="text" class="form-control" v-model="user.lastName" required>
                </div>

                <div class="mb-3">
                     <label for="email" class="form-label">Email</label>
                    <input type="email" class="form-control" v-model="user.email" required>
                </div>

                <div class="mb-3">
                     <label for="mobileNumber" class="form-label">Phone</label>
                    <input type="text" class="form-control" v-model="user.mobileNumber" required>
                </div>

                <div class="mb-3">
                    <button class="btn btn-primary btn-block">Add Student</button>
                </div>
            </form>

</template>

<script>
  import firebase from '../database';
  const db = firebase.ref("students-list");
    export default {
        data() {
            return {
                user: {
                }
            }
        },
        methods: {
            onFormSubmit(event) {
                event.preventDefault()
                db.push(this.user).then(() => {
                    alert("Student successfully created!");
                    this.$router.push('/students')
                    this.user.firstName = ''
                    this.user.lastName = ''
                    this.user.email = ''
                    this.user.mobileNumber = ''
                }).catch((error) => {
                    console.log(error);
                });
            }
        }
    }
</script>
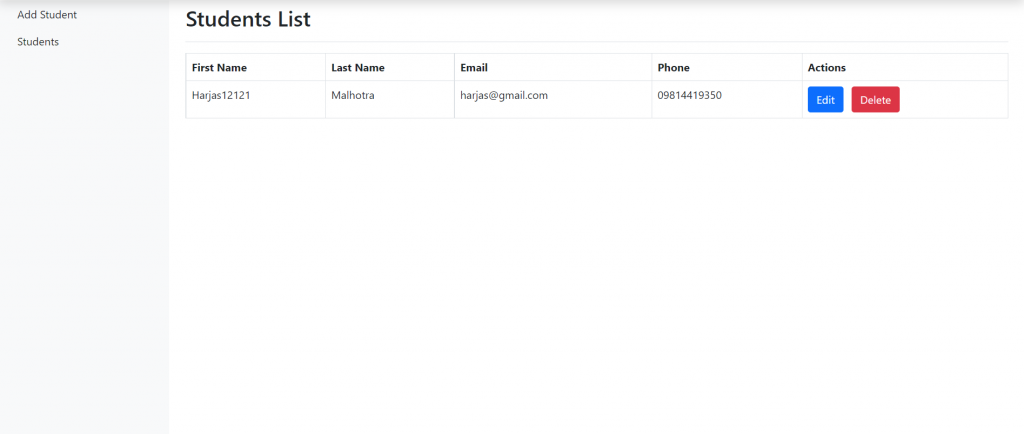
3. Now guy’s we need to create StudentList.vue file inside vuecrud/src/components folder and add below code inside it:
<template>
            <div class="d-flex justify-content-between flex-wrap flex-md-nowrap align-items-center pt-3 pb-2 mb-3 border-bottom">
            <h1 class="h2">Students List</h1>
            <!-- It won't show if there is no student data -->

        </div>
             <table class="table table-bordered table-responsive-sm table-responsive-md table-responsive-lg">
                <thead>
                <tr>
                        <th>First Name</th>
                        <th>Last Name</th>
                        <th>Email</th>
                        <th>Phone</th>
                        <th>Actions</th>
                    </tr>
                </thead>
                <tbody>
                    <tr v-for="student in studentlist" :key="student.key">
                        <td>{{ student.firstName }}</td>
                        <td>{{ student.lastName }}</td>
                        <td>{{ student.email }}</td>
                        <td>{{ student.mobileNumber }}</td>
                        <td>
                           <router-link :to="{name: 'edit-student', params: { id: student.key }}" class="btn btn-primary">Edit
                            </router-link>
                            <button @click.prevent="deleteUser(student.key)" class="btn btn-danger">Delete</button>
                        </td>
                    </tr>
                </tbody>
            </table>

</template>

<script>

    import firebase from "../database";
    const db = firebase.ref("students-list");

    export default {
        data() {
            return {
                studentlist: []
            }
        },
        created() {

            db.on("value", snapshot => {

                snapshot.forEach(snap => {
                    // snap.val() is the dictionary with all your keys/values from the 'students-list' path
                   // console.log(snap.val().firstName)
                    this.studentlist.push({
                        key: snap.key,
                        firstName: snap.val().firstName,
                        lastName: snap.val().lastName,
                        email: snap.val().email,
                        mobileNumber: snap.val().mobileNumber
                    });

                    //console.log(this.studentlist);
                });

            });
        },
        methods: {

            deleteUser(id){

              if (window.confirm("Do you really want to delete?")) {

                 db.child(id).remove().then(() => {

                    alert("Student successfully deleted!");


                }).catch((error) => {
                    console.log(error);
                });
              }
            }
        }
    }
</script>
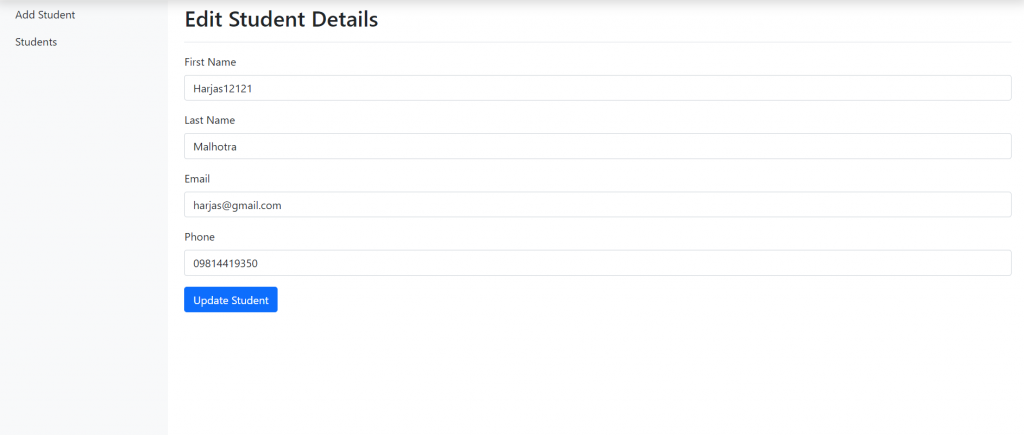
4. Now guy’s we need to create EditStudent.vue file inside vuecrud/src/components folder and add below code inside it:
<template>
            <div class="d-flex justify-content-between flex-wrap flex-md-nowrap align-items-center pt-3 pb-2 mb-3 border-bottom">
                <h1 class="h2">Edit Student Details</h1>

            </div>
            <form @submit.prevent="onUpdateForm">
                <div class="mb-3">
                    <label for="firstName" class="form-label">First Name</label>
                    <input type="text" class="form-control" v-model="student.firstName" required>
                </div>

                 <div class="mb-3">
                    <label for="lastName" class="form-label">Last Name</label>
                    <input type="text" class="form-control" v-model="student.lastName" required>
                </div>

               <div class="mb-3">
                     <label for="email" class="form-label">Email</label>
                    <input type="email" class="form-control" v-model="student.email" required>
                </div>

                <div class="mb-3">
                     <label for="mobileNumber" class="form-label">Phone</label>
                    <input type="text" class="form-control" v-model="student.mobileNumber" required>
                </div>

                <div class="mb-3">
                    <button class="btn btn-primary btn-block">Update Student</button>
                </div>
            </form>

</template>

<script>
    import firebase from '../database';
    const db = firebase.ref("students-list");

    export default {
        data() {
            return {
                student: {
                }
            }
        },
        created() {
            let dbRef = db.child(this.$route.params.id);
            dbRef.get().then((doc) => {

                this.student = doc.val();
            }).catch((error) => {
                console.log(error)
            })
        },
        methods: {
            onUpdateForm(event) {
                event.preventDefault()
                db.child(this.$route.params.id)
                .update(this.student).then(() => {

                     this.$router.push('/students')
                }).catch((error) => {
                    console.log(error);
                });
            }
        }
    }
</script>
5. Now guy’s we need to create new file datatable.js inside vuecrud/src folder and add below code inside it:
import firebase from "firebase";
import "firebase/database";

let config = {
    apiKey: "**********",
    authDomain: "**********",
    databaseURL: "**********",
    projectId: "**********",
    storageBucket: "**********",
    messagingSenderId: "**********",
    appId: "**********",
    measurementId: "**********"
};

firebase.initializeApp(config);

export default firebase.database();
6. Now guy’s we need to create router folder inside vuecrud/src folder and then create new file index.js inside vuecrud/src/router folder and add below code inside it for routing:
import { createWebHistory, createRouter } from "vue-router";
import AddStudent from "@/components/AddStudent.vue"
import EditStudent from "@/components/EditStudent.vue"
import Students from "@/components/StudentList.vue"

const routes = [
  {
    path: "/",
    name: "AddStudent",
    component: AddStudent,
  },
  {
    path: "/add-student",
    name: "add-student",
    component: AddStudent,
  },
  {
    path: "/edit-student/:id",
    name: "edit-student",
    component: EditStudent,
  },
  {
    path: "/students",
    name: "Students",
    component: Students,
  },
];

const router = createRouter({
  history: createWebHistory(),
  routes,
});

export default router;
7. Now guy’s we need to add below code inside vuecurd/src/main.js file:
import { createApp } from 'vue'
import App from './App.vue';
import 'bootstrap/dist/css/bootstrap.min.css';
import router from './router'

createApp(App).use(router).mount('#app')
8. Finally now guy’s we need to add below code inside vuecurd/src/app.vue file:
<template>
 <nav class="navbar navbar-dark fixed-top bg-dark flex-md-nowrap p-0 shadow p-2 mb-0">


    <span class="dasboard-text">Therichpost.com</span>

  <ul class="navbar-nav px-3">
    <li class="nav-item text-nowrap">

        Welcome Jassa

    </li>
  </ul>
</nav>
<!-- Sidebar navigation -->
<div class="container-fluid">
  <div class="row">
    <nav class="col-md-2 d-md-block bg-light sidebar vh-100" style="margin-top: 60px;">
      <div class="sidebar-sticky">
        <ul class="nav flex-column">


          <li class="nav-item">

            <router-link class="nav-link link-dark" to="/add-student">
             Add Student
           </router-link>
          </li>

          <li class="nav-item">
            <router-link class="nav-link link-dark" to="/students">
             Students
          </router-link>
          </li>
        </ul>
      </div>
    </nav>
    <!-- Main content -->
    <main role="main" style="margin-top: 50px;" class="col-md-9 ml-sm-auto col-lg-10 px-4">
      <div class="inner-adjust">
        <!-- Use router template to show the components for which router service is activated -->
         <router-view />
      </div>
    </main>
  </div>
</div>
<div class="jumbotron text-center mb-0 fixed-bottom bg-dark text-white">
 <p>therichpost.com</p>
</div>
</template>
Now we are done guy’s and if you have any kind of query then please comment below.
Note: Friends, I just tell the basic setup and things, you can change the code according to your requirements.
I will appreciate that if you will tell your views for this post. Nothing matters if your views will be good or bad.
Jassa
Thanks
Leave a Reply