
Hello friends, welcome back to my blog. Today in this blog post, I am going to show you, Vue 3 Routing Working Example.
Guy’s this post will be very helpful for the beginners. With this post we will learn how to create components layout files(header, footer), view files(home, about). Linking components to routes path. This will also help for making well structure project. Also I have used Bootstrap 5 for responsiveness and good looks.
Vue3 and Bootstrap 5 came and if you are new then you must check below two links:
Friends now I proceed onwards and here is the working code snippet and use this carefully to avoid the mistakes:
1. Firstly friends we need fresh vue 3 setup and for this we need to run below commands . Secondly we should also have latest node version installed on our system. With below we will have vue router, bootstrap 5(optional, if you don’t want then you can skip this) modules in our Vue 3 application:
npm install -g @vue/cli

vue create vuerouting

cd vuerouting

npm i vue-router@next

npm i bootstrap@next

npm i @popperjs/core

npm run serve //http://localhost:8080/
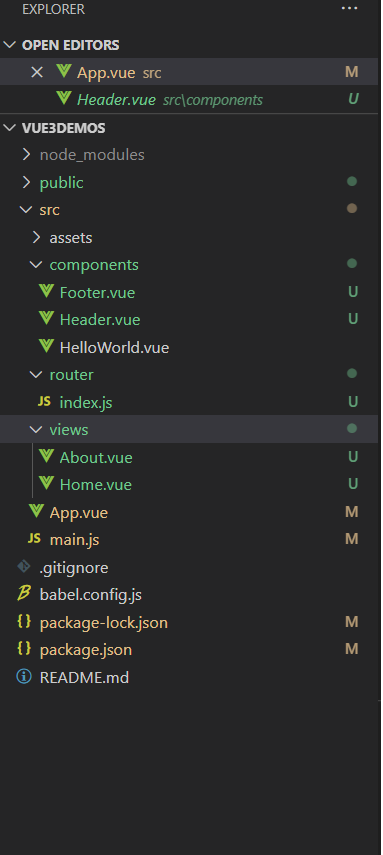
2. Now friends we need to create new file `Header.vue` inside src/components folder and add below code inside it, in this I am calling the router links which will navigate to views:
<template>
    <nav class="navbar navbar-expand-lg navbar-light bg-light">
    <div class="container px-4 px-lg-5">
      <router-link class="navbar-brand" to="/">TheRich Shop</router-link>

        <button class="navbar-toggler" type="button" data-bs-toggle="collapse" data-bs-target="#navbarSupportedContent" aria-controls="navbarSupportedContent" aria-expanded="false" aria-label="Toggle navigation"><span class="navbar-toggler-icon"></span></button>
        <div class="collapse navbar-collapse" id="navbarSupportedContent">
            <ul class="navbar-nav me-auto mb-2 mb-lg-0 ms-lg-4">

                <li class="nav-item"><router-link class="nav-link active" to="/">Home</router-link></li>
                 <li class="nav-item"><router-link class="nav-link" to="/about">About</router-link></li>

            </ul>

        </div>
    </div>
  </nav>
</template>
3. Now friends we need to create new file `Footer.vue` inside src/components folder and add below code inside it:
<template>
    <div class="container-fluid text-center bg-light p-5 fixed-bottom">
    <p>Footer</p>
</div>
</template>
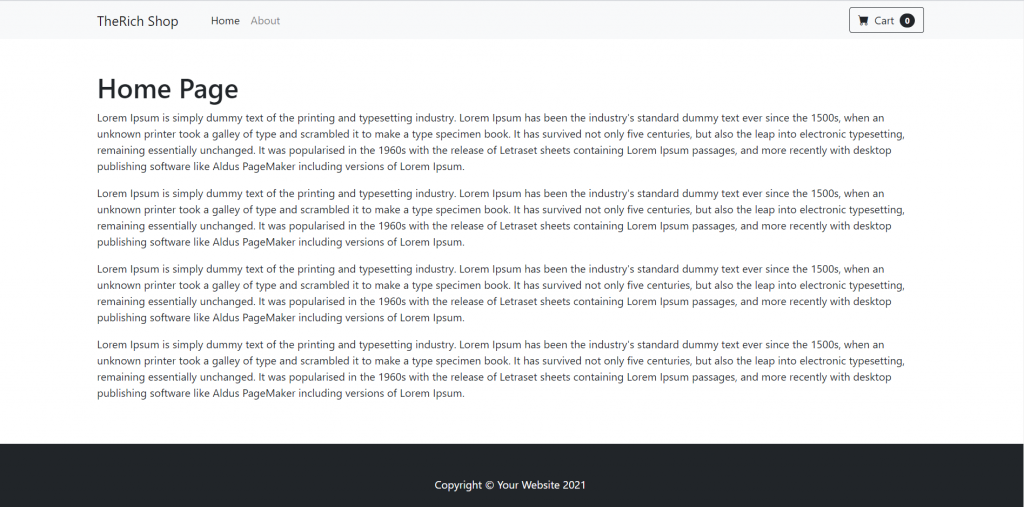
4. Now friends we need to create new folder `views` inside `src` folder and after it create new file `Home.vue` inside src/views folder and add below code inside it:
<template>
  <h1>Home Page</h1>
  <p>Lorem Ipsum is simply dummy text of the printing and typesetting industry. Lorem Ipsum has been the industry's standard dummy text ever since the 1500s, when an unknown printer took a galley of type and scrambled it to make a type specimen book. It has survived not only five centuries, but also the leap into electronic typesetting, remaining essentially unchanged. It was popularised in the 1960s with the release of Letraset sheets containing Lorem Ipsum passages, and more recently with desktop publishing software like Aldus PageMaker including versions of Lorem Ipsum.
      </p>
      <p>Lorem Ipsum is simply dummy text of the printing and typesetting industry. Lorem Ipsum has been the industry's standard dummy text ever since the 1500s, when an unknown printer took a galley of type and scrambled it to make a type specimen book. It has survived not only five centuries, but also the leap into electronic typesetting, remaining essentially unchanged. It was popularised in the 1960s with the release of Letraset sheets containing Lorem Ipsum passages, and more recently with desktop publishing software like Aldus PageMaker including versions of Lorem Ipsum.
      </p>
</template>
5. Now friends we need to create new file `About.vue` inside src/views folder and add below code inside it:
<template>
  <h1>About Page</h1>
    <p>Lorem Ipsum is simply dummy text of the printing and typesetting industry. Lorem Ipsum has been the industry's standard dummy text ever since the 1500s, when an unknown printer took a galley of type and scrambled it to make a type specimen book. It has survived not only five centuries, but also the leap into electronic typesetting, remaining essentially unchanged. It was popularised in the 1960s with the release of Letraset sheets containing Lorem Ipsum passages, and more recently with desktop publishing software like Aldus PageMaker including versions of Lorem Ipsum.
      </p>

</template>
6. Now friends we need to create new folder `router` inside `src` folder and after it create new file `index.js` inside src/router folder and add below code inside it:
import { createWebHistory, createRouter } from "vue-router";
import Home from "@/views/Home.vue";
import About from "@/views/About.vue";

const routes = [
  {
    path: "/",
    name: "Home",
    component: Home,
  },
  {
    path: "/about",
    name: "About",
    component: About,
  },
];

const router = createRouter({
  history: createWebHistory(),
  routes,
});

export default router;
7. Now friends we need to add below code inside src/main.js file to call the routing:
import { createApp } from 'vue'
import App from './App.vue'
import router from './router'
createApp(App).use(router).mount('#app')
8. Now friends we need to add below code into src/App.vue file to check the final output on browser:
<template>
   <Header></Header>
   <div class="container p-5">
    <router-view />
    </div>
    <Footer></Footer>
</template>

<script>

//importing bootstrap 5 Modules
import "bootstrap/dist/css/bootstrap.min.css";
import "bootstrap/dist/js/bootstrap.min.js";
import Header from './components/Header'
import Footer from './components/Footer'
export default {

components: {
    Header,
    Footer
  }
}
</script>
Now we are done friends and If you have any kind of query or suggestion or any requirement then feel free to comment below.
Note: Friends, I just tell the basic setup and things, you can change the code according to your requirements.
I will appreciate that if you will tell your views for this post. Nothing matters if your views will be good or bad.
Jassa
Thanks.
Leave a Reply