
Hello to all, welcome to therichpost.com. In this post, I will tell you, How to login in Laravel with facebook?
Here are code snippet and commands, please use them carefully:
1. Here are the basic commands to set laravel 7 working environment:
composer global require laravel/installer

composer create-project --prefer-dist laravel/laravel laravel7auth

cd laravel7auth
2. After run the above commands, run below command provides a quick way to scaffold all of the routes and views you need for authentication using a few simple commands:
composer require laravel/ui --dev
3. After above command below command should be used on fresh applications and will install a layout view, registration and login views, as well as routes for all authentication endpoints:
php artisan ui vue --auth
4. Now these two commands will be use to styling view layouts like login form, registration etc:
npm install
npm run dev
5. Now run below command and you will see below two images kind of screens:
php artisan serve

6. After above please check below post link to set laravel database with laravel migrate command:
Now come to main Social login process:
1. Run below command to Socialite package into your laravel 7 application:
composer require laravel/socialite
2. Before using Socialite, you will also need to add credentials for the OAuth services your application utilizes. These credentials should be placed in your config/services.php configuration file, and should use the key facebook, twitter, linkedin, google, github, gitlab or bitbucket, depending on the providers your application requires. For example:
...
'facebook' => [

    'client_id'     => env('FACEBOOK_CLIENT_ID'),
    'client_secret' => env('FACEBOOK_CLIENT_SECRET'),
    'redirect'      => env('FACEBOOK_CALLBACK_URL'),
  ],
...
3. After successful installation, time to update the provider and aliases in the default configuration file located at config/app.php:
'providers' => [
    // Other service providers...
    Laravel\Socialite\SocialiteServiceProvider::class,
],
'aliases' => [
    // aliases
    'Socialite' => Laravel\Socialite\Facades\Socialite::class,
]
4. Next, you are ready to authenticate users! You will need two routes: one for redirecting the user to the OAuth provider, and another for receiving the callback from the provider after authentication. We will access Socialite using the Socialite facade. Create new controller file SocialAuthController.php in app\Http\Controllers folder and add below code into it:
<?php

namespace App\Http\Controllers;
use Illuminate\Support\Str;
use Illuminate\Http\Request;
use Socialite;
class SocialAuthController extends Controller
{
   private $apiToken;
   public function __construct()
    {
    $this->apiToken = uniqid(base64_encode(Str::random(40)));
    }
    public function redirect() {

         return Socialite::driver('facebook')->redirect();
    }
    public function callback() {
        $user = Socialite::with ( 'facebook' )->user ();

        return view ( 'home' )->withDetails ( $user )->withService ( 'facebook' );

    }
}
5. The redirect method takes care of sending the user to the OAuth provider, while the user method will read the incoming request and retrieve the user’s information from the provider. Of course, you will need to define routes to your controller methods in routes/web.php file:
Route::get ( '/redirect/facebook', 'SocialAuthController@redirect' );
Route::get ( '/callback/facebook', 'SocialAuthController@callback' );
6. Now add below code into your .env file to add variables value, which we add ablove into service.php file:
FACEBOOK_CLIENT_ID=*****************
FACEBOOK_CLIENT_SECRET=***********************
FACEBOOK_CALLBACK_URL=http://127.0.0.1:8000/callback/facebook
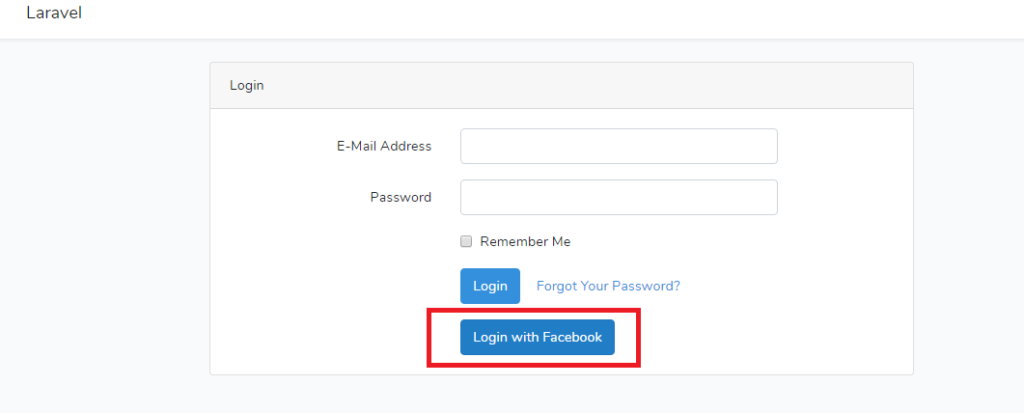
7. Here is the code, you need to replace into your resources\views\auth\login.blade.php file:
...

<div class="form-group row mb-0">
                            <div class="col-md-8 offset-md-4">
                                <button type="submit" class="btn btn-primary">
                                    {{ __('Login') }}
                                </button>

                                @if (Route::has('password.request'))
                                    <a class="btn btn-link" href="{{ route('password.request') }}">
                                        {{ __('Forgot Your Password?') }}
                                    </a>
                                @endif
                <br>
                 <a href='{{ url("redirect/facebook") }}' class="btn btn-primary mt-3">
                                    {{ __('Login with Facebook') }}
                                </a>
                            </div>
                        </div>

...
8. After all this done, run php artisan serve command into your terminal and run below url into your browser and your will be login with facebook id:
http://127.0.0.1:8000/login
If you have any kind of query then please do comment below.
Jassa
Thank you
Leave a Reply