
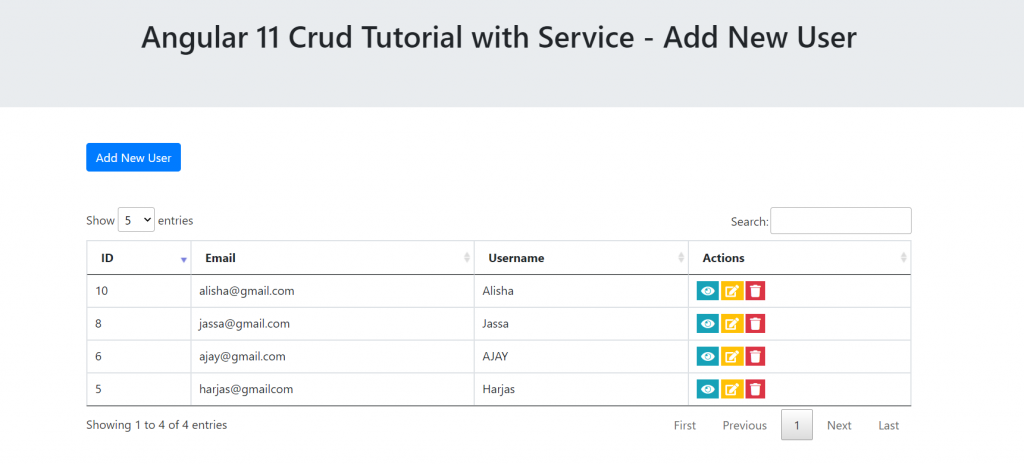
Hello friends, welcome back to my blog. Today in this blog post, I am going to tell you, Angular 11 Crud Tutorial with Service – Add New User.
Here are the complete working video and pictures for better understanding:
Angular 11 came and if you are new then you must check below link:
Friends now I proceed onwards and here is the working code snippet for Angular 11 Crud Tutorial with Service – Add New User and please use carefully this to avoid the mistakes:
1. Firstly friends we need fresh angular 11 setup and for this we need to run below commands but if you already have angular 11 setup then you can avoid below commands. Secondly we should also have latest node version installed on our system:
npm install -g @angular/cli

ng new angularcrud //Create new Angular Project

cd angularcrud // Go inside the Angular Project Folder

ng serve --open // Run and Open the Angular Project

http://localhost:4200/ // Working Angular Project Url
2. Now friends, here we need to run below commands into our project terminal to install datatable modules, bootstrap(for good looks), jquery, sweetalert modules into our angular application:
npm install jquery --save

npm install datatables.net --save

npm install datatables.net-dt --save

npm install angular-datatables --save

npm install @types/jquery --save-dev

npm install @types/datatables.net --save-dev

npm install --save sweetalert2

npm install bootstrap --save
3. After done with commands add below code into you angular.json file:
 "styles": [
              ...
              "src/styles.css",
              "node_modules/datatables.net-dt/css/jquery.dataTables.css",
              "node_modules/bootstrap/dist/css/bootstrap.min.css",
              "node_modules/sweetalert2/src/sweetalert2.scss"
           ],
"scripts": [
              ...
              "node_modules/jquery/dist/jquery.js",
              "node_modules/datatables.net/js/jquery.dataTables.js",
              "node_modules/bootstrap/dist/js/bootstrap.js",
              "node_modules/sweetalert2/dist/sweetalert2.js"
           ]
4. Now friends, we need to run below commands to create service file and run our angular project:
ng g service crud

ng serve --o
5. Now friends we just need to add below code into src/app/app.module.ts file:
...

import { HttpClientModule } from '@angular/common/http';
import {ReactiveFormsModule} from '@angular/forms';
...
imports: [
...

HttpClientModule,
ReactiveFormsModule
]
6. Now friends we just need to add below code into src/app/crud.service.ts file:
import { Injectable } from '@angular/core';
import { HttpClient } from '@angular/common/http';
@Injectable({
  providedIn: 'root'
})
export class CrudService {
  userData:any;
  constructor(private http:HttpClient) { }

  //Get User Service
  public getusers()
      {

          return this.http.get('http://localhost/users.php');
      }

  //Add User Service
  public adduser(userData)
  {
    return this.http.post('http://localhost/users.php/'
  , userData).subscribe((res: Response) => {

  });
  }


}
7. Now friends we just need to add below code into src/app/app.component.ts file:
...
import { FormBuilder, FormGroup, Validators } from '@angular/forms';
import Swal from 'sweetalert2/dist/sweetalert2.js';
import { CrudService } from './crud.service';
declare let $: any;
export class AppComponent {
...
constructor(private crudservice: CrudService, private formBuilder: FormBuilder) {}
//Data variable to store user data
data = [];
//Add User Details From Functionality starts
addForm: FormGroup;
submitted = false;
userdata:any;
get f() { return this.addForm.controls; }
onSubmit() {
this.submitted = true;
// stop here if form is invalid
if (this.addForm.invalid) {
return;
}
if(this.submitted)
{
// Initialize Params Object
var myFormData = new FormData();
// Begin assigning parameters
myFormData.append('myUsername', this.addForm.value.firstname);
myFormData.append('myEmail', this.addForm.value.email);
//Submit User details service action
this.crudservice.adduser(myFormData);
this.crudservice.getusers().subscribe((ret: any[])=>{
this.data = ret;
$("#addUser").modal("hide");
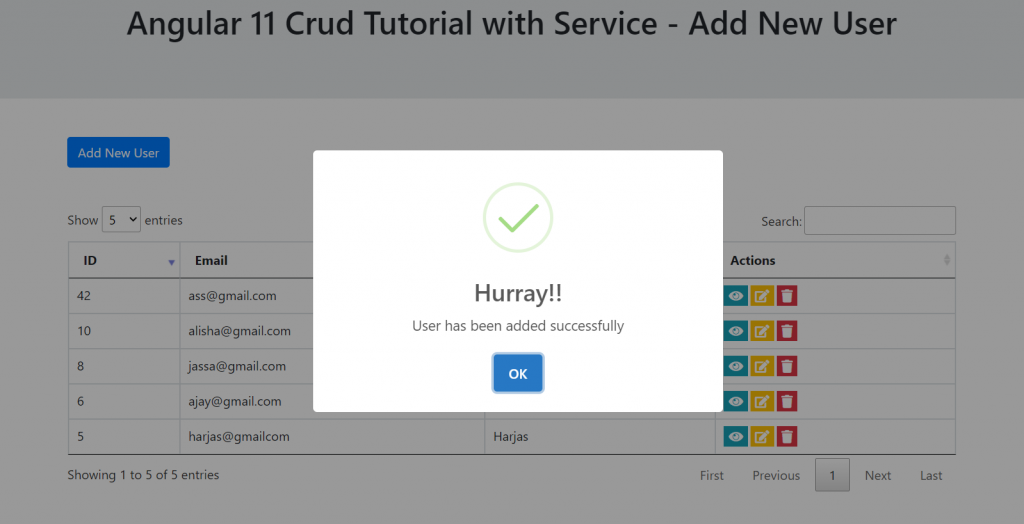
//sweetalert message popup
Swal.fire({
title: 'Hurray!!',
text: "User has been added successfully",
icon: 'success'
});
//Destroy old datatable for getting new latest data
$('#datatableexample').DataTable().destroy();
//get user details sevice and show inside datatable
this.crudservice.getusers().subscribe((ret: any[])=>{
this.data = ret;
setTimeout(()=>{
$('#datatableexample').DataTable( {
pagingType: 'full_numbers',
pageLength: 5,
processing: true,
lengthMenu : [5, 10, 25],
order:[0,"desc"]
} );
}, 500);
});
});
}
}
ngOnInit() {
//Add form validations
this.addForm = this.formBuilder.group({
email: ['', [Validators.required, Validators.email]],
firstname: ['', [Validators.required]]
});
//get users details and show inside datatable
this.crudservice.getusers().subscribe((ret: any[])=>{
this.data = ret;
setTimeout(()=>{
$('#datatableexample').DataTable( {
pagingType: 'full_numbers',
pageLength: 5,
processing: true,
lengthMenu : [5, 10, 25],
order:[0,"desc"]
} );
}, 100);
});
}
//Add New User Button Click Function
addnewuser()
{
$("#addUser").modal("show");
}
}
8. Now friends we just need to add below code into src/app/app.component.html file to see the output on browser:
<!--Add User Button-->
<button class="btn btn-primary mb-5" (click)="addnewuser()">Add New User</button>
<!--Datatable with User Details-->
<table class="table table-hover table-bordered" id="datatableexample">
<thead>
<tr>
<th>ID</th>
<th>Email</th>
<th>Username</th>
</tr>
</thead>
<tbody>
<tr *ngFor="let group of data">
<td>{{group.id}}</td>
<td>{{group.email}}</td>
<td>{{group.username}}</td>
</tr>
</tbody>
</table>
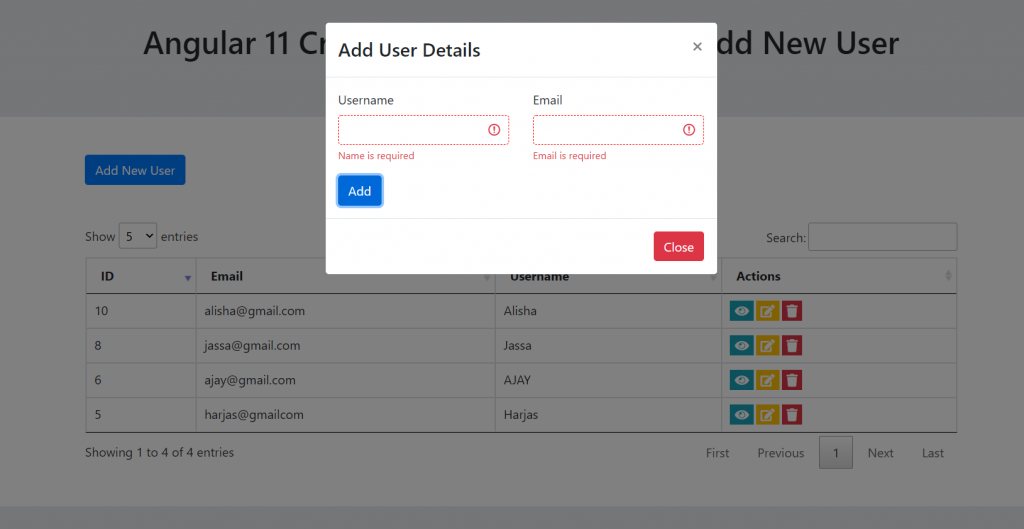
<!--Add User Modal-->
<div class="modal" id="addUser">
<div class="modal-dialog">
<div class="modal-content">
<div class="modal-header">
<h4 class="modal-title align-center">Add User Details</h4>
<button type="button" class="close" data-dismiss="modal">×</button>
</div>
<div class="modal-body">
<form [formGroup]="addForm" (ngSubmit)="onSubmit()">
<div class="row">
<div class="col-sm-6">
<div class="form-group">
<label>Username</label>
<input type="text" formControlName="firstname" class="form-control" [ngClass]="{ 'is-invalid': submitted && f.firstname.errors }" />
<div *ngIf="submitted && f.firstname.errors" class="invalid-feedback">
<div *ngIf="f.firstname.errors.required">Name is required</div>
</div>
</div>
</div>
<div class="col-sm-6">
<div class="form-group">
<label>Email</label>
<input type="text" formControlName="email" class="form-control" [ngClass]="{ 'is-invalid': submitted && f.email.errors }" />
<div *ngIf="submitted && f.email.errors" class="invalid-feedback">
<div *ngIf="f.email.errors.required">Email is required</div>
<div *ngIf="f.email.errors.email">Email must be a valid email address</div>
</div>
</div>
</div>
</div>
<button type="submit" class="btn btn-primary">Add</button>
</form>
</div>
<div class="modal-footer">
<button type="button" class="btn btn-danger" data-dismiss="modal">Close</button>
</div>
</div>
</div>
</div>
9. Now friends here is my php code snippet to fetch and save data and show into angular 11 and I added this code into my xampp/htdocs/users.php file:
//Please create users database inside phpmysql admin and create userdetails tabel and create id, email and username fields
<?php
//Please create users database inside phpmysql admin and create userdetails tabel and create id, email and username fields

$servername = "localhost";
$username   = "root";
$password   = "";
$dbname     = "users";
// Create connection
$conn = new mysqli($servername, $username, $password, $dbname);
// Check connection
if ($conn->connect_error) {
    die("Connection failed: " . $conn->connect_error);
}
//Add user
if(isset($_POST['myEmail']))
{
    $sql = "INSERT INTO userdetails (email, username)
        VALUES ('".$_POST['myEmail']."', '".$_POST['myUsername']."')";
    if (mysqli_query($conn,$sql)) {
    $data = array("data" => "You Data added successfully");
        echo json_encode($data);
    } else {
        $data = array("data" => "Error: " . $sql . "<br>" . $conn->error);
        echo json_encode($data);

    }
}
else
{
    //get all users details
    $trp = mysqli_query($conn, "SELECT * from userdetails");
    $rows = array();
    while($r = mysqli_fetch_assoc($trp)) {
        $rows[] = $r;
    }
    print json_encode($rows);
}

?>
Now we are done friends. If you have any kind of query or suggestion or any requirement then feel free to comment below.
In next post, I will tell you, Angular 11 Crud Tutorials with Services – View User.
Note: Friends, I just tell the basic setup and things, you can change the code according to your requirements. For better understanding must watch video above.
I will appreciate that if you will tell your views for this post. Nothing matters if your views will be good or bad.
Jassa
Thanks
Leave a Reply