
Hello friends, welcome back to my blog. Today in this blog post, I am going to tell you, Reactjs Laravel 8 User Contact Form with Send Email Functionality.
For reactjs new comers, please check the below link:
Friends now I proceed onwards and here is the working code snippet for Reactjs Laravel 8 User Contact Form with Send Email Functionality and please use this carefully to avoid the mistakes:
1. Firstly friends we need fresh reactjs setup and for that we need to run below commands into our terminal and also w should have latest node version installed on our system:
npx create-react-app reactlaravel

cd reactlaravel

npm start // run the project
2. Now we need to run below commands to get bootstrap(for good layout), sweetalert and axios(to post data request to laravel) modules into our react js app:
npm install sweetalert2-react

npm install bootstrap --save

npm install axios --save

npm start
3. Now friends we need to add below code into our src/App.js file to get final output on web browser:
import React from 'react';
import './App.css';

//bootstrap
import 'bootstrap/dist/css/bootstrap.min.css';

//Include Sweetalert
import Swal from 'sweetalert2'

//axios for api request
import axios from 'axios';

class AddUser extends React.Component {
  constructor(props)
    {
      super(props);
      this.addFormData = this.addFormData.bind(this);
    }
  // Mail Form Submission
  addFormData(evt)
    {
      evt.preventDefault();
      const fd = new FormData();
      fd.append('myUsername', this.refs.myUsername.value);
      fd.append('myEmail', this.refs.myEmail.value);
      fd.append('textquery', this.refs.textquery.value);

      axios.post('http://localhost/laravel8/public/api/send/email', fd
      ).then(res=>
      {

    this.myFormRef.reset();
    //Success Message in Sweetalert modal
    Swal.fire({
      title: 'Hurray!!',
      text: "Mail has been send successfully.",
      type: 'success',

    });

    }
    );
    }

  render() {

    return (

      <div className="maincontainer">


        <div className="container mb-5 mt-5 text-left">

        <form ref={(el) => this.myFormRef = el}>
        <div className="form-group">
        <input type="email" className="form-control" id="Email" aria-describedby="emailHelp" placeholder="Enter email" ref="myEmail" />

        </div>
        <div className="form-group">
        <input type="text" className="form-control" id="Username" placeholder="Enter Username" ref="myUsername" />
        </div>

        <div className="form-group">
        <textarea className="form-control" id="textquery" placeholder="Enter Query" ref="textquery"></textarea>
        </div>
        <button type="submit" className="btn btn-primary" onClick={this.addFormData}>Send Mail</button>
      </form>


      </div>


      </div>

)
};
}

export default AddUser;
Laravel Section Start
1.
a) Now friends we need to create `email` folder inside `resources/view folder
b) Now create new name.blade.php file inside resources/views/email folder
c) Now add below code into resources/views/ email/name.blade.php file
<div>
Name  : {{ $data1["Name"] }}<br>
Email : {{ $data1["Email"] }}<br>
Query : {{ $data1["Query"] }}
</div>
2. Now friends, we need to add below code into our laravel 8 project routes/api.php file:
//Email Route which we used in angular http service
Route::post('send/email', [App\Http\Controllers\HomeController::class, 'mail'])->name('email');
3. Now friends, we need to add below code into our laravel 8 project app/Http/Controllers/HomeController.php file:
<?php

namespace App\Http\Controllers;

use Illuminate\Http\Request;

use Illuminate\Support\Facades\Mail;

class HomeController extends Controller
{
    ...

    public function mail(Request $request)
    {

        $data = [
                'Name'  => $request->input('myUsername'),
                'Email' => $request->input('myEmail'),
                'Query' => $request->input('textquery')
                ];

        //Mail Function
        Mail::send('email.name', ['data1' => $data], function ($m) {

            $m->to('therichposts@gmail.com')->subject('Contact Form Mail!');
    });

        //Json Response For Angular frontend
        return response()->json(["message" => "Email sent successfully."]);
    }
}
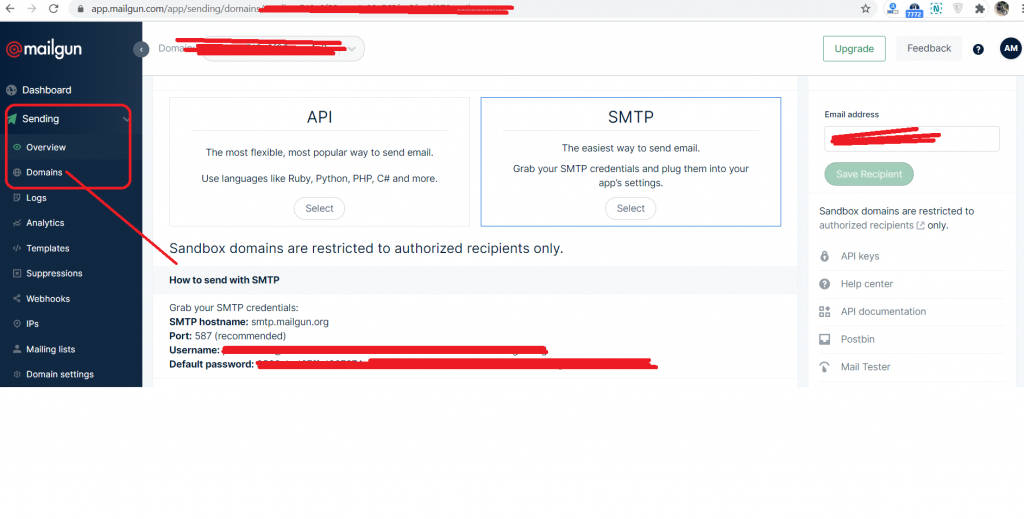
6. Finally but not the last, we need to set mailgun credentials into our Laravel 8 project .env file:
MAIL_DRIVER=mailgun
MAIL_HOST=smtp.mailgun.org
MAIL_PORT=587
MAIL_USERNAME=**************************************************
MAIL_PASSWORD=**************************************************
MAIL_ENCRYPTION=tls
Now we are done friends and don’t forget to start your Laravel 8 project server also and If you have any kind of query or suggestion or any requirement then feel free to comment below.
Guys in this post, I am sending email from my reactjs front-end via Laravel 8 backend with the help of mailgun.
Note: Friends, I just tell the basic setup and things, you can change the code according to your requirements. For better understanding must watch video above.
I will appreciate that if you will tell your views for this post. Nothing matters if your views will be good or bad.
Jassa
Thanks
Leave a Reply