
Hello guys how are you? Welcome back to my blog. Guys today in this blog post I am Creating an e-commerce website using React.js and React-Bootstrap.
Creating an e-commerce website using React.js and Bootstrap 5 React-Bootstrap involves setting up your React project, integrating Bootstrap for styling, and creating components for your e-commerce features. Here’s a step-by-step guide to get you started:
For react js new comers, please check the below links:
1. Environment Setup
Make sure you have Node.js installed on your system. You can download it from nodejs.org. This will include npm, which is needed to install packages.
2. Create React Project
Use Create React App to set up a new project. Open your terminal and run:
npx create-react-app ecommerce-site
Navigate to your project directory:
cd ecommerce-site
3. Install Bootstrap 5
Install Bootstrap 5 and its dependencies:
npm install react-bootstrap bootstrap@5
4. Creating the Layout
Let’s create basic components for your e-commerce site like the header, footer, product list, and a product detail page.
Create Component Folders
In your project directory, structure your components for better management:
mkdir src/components
cd src/components
mkdir Header Footer ProductList ProductDetail
touch Header/Header.jsx Footer/Footer.jsx ProductList/ProductList.jsx ProductDetail/ProductDetail.jsx
Sample Header Component
Edit src/components/Header/Header.jsx:
import React from 'react';
import { Navbar, Nav, NavDropdown, Container } from 'react-bootstrap';
import { Link } from 'react-router-dom';

function Header() {
  return (
    <Navbar bg="light" expand="lg">
      <Container>
        <Navbar.Brand as={Link} to="/">React E-Commerce Site</Navbar.Brand>
        <Navbar.Toggle aria-controls="basic-navbar-nav" />
        <Navbar.Collapse id="basic-navbar-nav">
          <Nav className="me-auto">
            <Nav.Link as={Link} to="/">Home</Nav.Link>
            <Nav.Link as={Link} to="/">Products</Nav.Link>
            <NavDropdown title="Categories" id="basic-nav-dropdown">
              <NavDropdown.Item as={Link} to="/category/electronics">Electronics</NavDropdown.Item>
              <NavDropdown.Item as={Link} to="/category/clothing">Clothing</NavDropdown.Item>
              <NavDropdown.Item as={Link} to="/category/accessories">Accessories</NavDropdown.Item>
              <NavDropdown.Divider />
              <NavDropdown.Item as={Link} to="/sale">Sale</NavDropdown.Item>
            </NavDropdown>
          </Nav>
        </Navbar.Collapse>
      </Container>
    </Navbar>
  );
}

export default Header;
Sample Footer Component
Edit src/components/Footer/Footer.jsx:
import React from 'react';
import { Container } from 'react-bootstrap';

function Footer() {
  return (
    <footer className="bg-light text-center text-lg-start">
      <Container className="p-4">
        <div className="text-center p-3" style={{ backgroundColor: 'rgba(0, 0, 0, 0.2)' }}>
          © 2024 E-commerce Site:
          <a className="text-dark" href="#">ecommerce-site.com</a>
        </div>
      </Container>
    </footer>
  );
}

export default Footer;
5. Add Routing
Install React Router to handle routing:
npm install react-router-dom
Configure your routes in src/App.js:
import React from 'react';
import { BrowserRouter as Router, Routes, Route } from 'react-router-dom';
import Header from './components/Header/Header';
import Footer from './components/Footer/Footer';
import ProductList from './components/ProductList/ProductList';
import ProductDetail from './components/ProductDetail/ProductDetail';

function App() {
  return (
    <Router>
      <Header />
      <Routes>
        <Route path="/" element={<ProductList />} />
        <Route path="/product/:id" element={<ProductDetail />} />
      </Routes>
      <Footer />
    </Router>
  );
}

export default App;
Let’s create the ProductList and ProductDetail components for your e-commerce website. These components will display a list of products and detailed views of individual products, respectively.
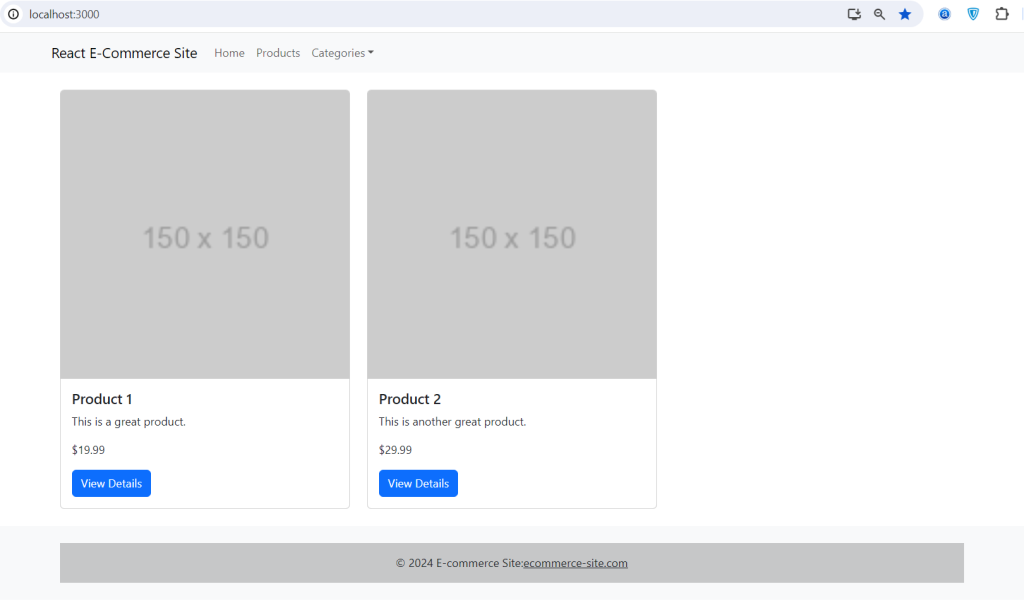
6. Creating the ProductList Component
The ProductList component will display all available products. You can use cards from Bootstrap to display each product. Here’s an example of what the ProductList component might look like:
- Create the File:
- Create a file named
ProductList.jsxinside theProductListdirectory.
- Create a file named
- Implement the Component:
- Edit
src/components/ProductList/ProductList.jsx:
- Edit
import React from 'react';
import { Card, Button, Row, Col, Container } from 'react-bootstrap';
import { Link } from 'react-router-dom';

const products = [
  { id: 1, name: 'Product 1', description: 'This is a great product.', price: '$19.99' },
  { id: 2, name: 'Product 2', description: 'This is another great product.', price: '$29.99' },
  // Add more products as needed
];

function ProductList() {
  return (
    <Container className="p-4">
    <Row xs={1} md={2} lg={3} className="g-4">
      {products.map((product) => (
        <Col key={product.id}>
          <Card>
          <Card.Img variant="top" src="https://via.placeholder.com/150" />

            <Card.Body>
              <Card.Title>{product.name}</Card.Title>
              <Card.Text>{product.description}</Card.Text>
              <Card.Text>{product.price}</Card.Text>
              <Link to={`/product/${product.id}`} className="btn btn-primary">View Details</Link>
            </Card.Body>
          </Card>
        </Col>
      ))}
    </Row>
    </Container>
  );
}

export default ProductList;
This component uses a hard-coded list of products. In a real application, you’d likely fetch this data from a backend API.
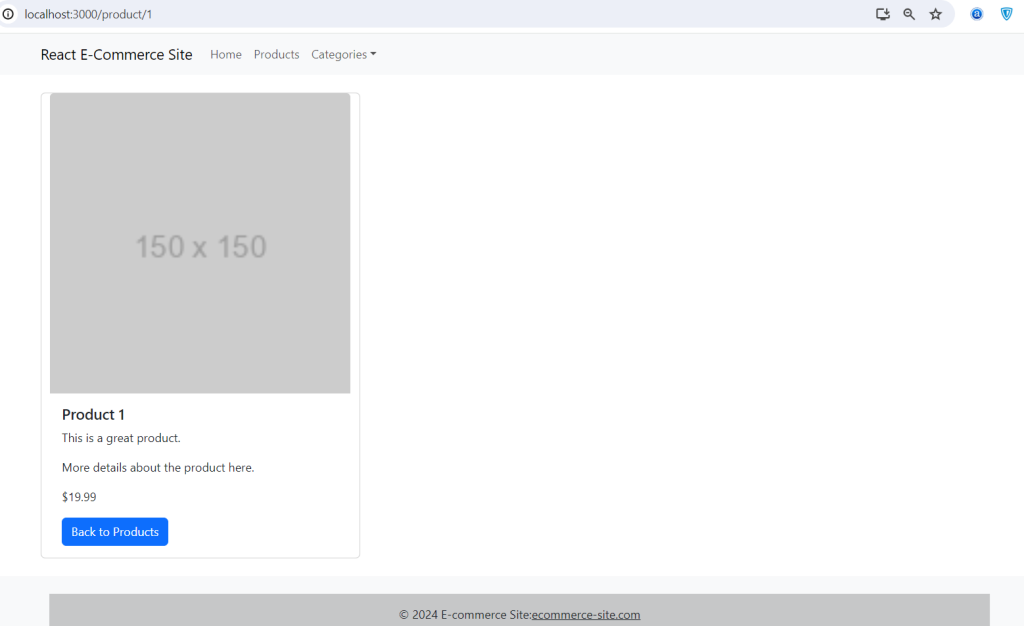
7. Creating the ProductDetail Component
The ProductDetail component will display detailed information about a specific product. Here’s an example of what the ProductDetail component might look like:
- Create the File:
- Create a file named
ProductDetail.jsxinside theProductDetaildirectory.
- Create a file named
- Implement the Component:
- Edit
src/components/ProductDetail/ProductDetail.jsx:
- Edit
import React from 'react';
import { Card, Button, Container, Row } from 'react-bootstrap';
import { useParams } from 'react-router-dom';
import { Link } from 'react-router-dom';

const products = [
  { id: 1, name: 'Product 1', description: 'This is a great product.', price: '$19.99', details: 'More details about the product here.' },
  { id: 2, name: 'Product 2', description: 'This is another great product.', price: '$29.99', details: 'More details about the product here.' },
  // Add more products as needed
];

function ProductDetail() {
  const { id } = useParams();
  const product = products.find(p => p.id === parseInt(id));

  return (
    <Container className="p-4">
        <Row xs={1} md={2} lg={3} className="g-4">
            <Card>
            <Card.Img variant="top" src="https://via.placeholder.com/150" />
                <Card.Body>
                <Card.Title>{product.name}</Card.Title>
                <Card.Text>{product.description}</Card.Text>
                <Card.Text>{product.details}</Card.Text>
                <Card.Text>{product.price}</Card.Text>
                <Link to="/" className="btn btn-primary">Back to Products</Link>

                </Card.Body>
            </Card>
      </Row>
    </Container>
  );
}

export default ProductDetail;
In this implementation, the useParams hook from react-router-dom is used to extract the product ID from the URL, which is then used to find the correct product in the list.
8. Starting Your Development Server
Return to your project root directory and start your React application:
npm start
Next Steps
- Integrate API Calls: Replace the static product data with API calls to fetch data from a backend server.
- Error Handling: Add error handling for cases where the product does not exist or the API call fails.
- Enhance UI/UX: Improve the user interface and user experience by adding more interactive elements and responsive design features.
With these components, you now have a basic structure for listing products and displaying product details. You can build upon this foundation with more complex features and functionalities as needed for your e-commerce site.
This setup gives you a basic structure for your e-commerce site using React and React-Bootstrap 5. You can extend this by adding state management with Redux, connecting to a backend server, and integrating payment gateways to create a full-fledged e-commerce platform.
This is it guys and if you will have any kind of query, suggestion or requirement then feel free to comment below.
Thanks
Ajay
Leave a Reply