Author: therichpost

  • Angular 7 include html template working example

    Angular 7 include html template working example

    Hello to all, welcome to therichpost.com. In this post, I will tell you, Angular 7 include html template working example.

    If you are new in Angular 7, then please check the my old posts related to Angular 7.

    Updated this post with Angular 9 include html file and solve all issue regarding old version:

    Include custom css file into our Angular 9

    Angular Include Html

    I am sure, this post will very helpful to all my blog viewers. Most of my Blog readers asked me many questions related to this post and finally I came this post : Angular include html template working example


    Here are the coding snippets for Angular 7 include html template working example and please follow carefully:


    1. Very First, please run the below commands into your terminals to install fresh Angular setup:

    $ npm install -g @angular/cli 
    
    
    ng new angularincludehtmltemplate //install new Angular 7 setup
    
    
    cd angularincludehtmltemplate // Go inside fresh installed Angular 7 setup
    
    
    ng serve // run angular 7 project
    
    
    http://localhost:4200/ //run on browser

    2. Now create views folder inside angularincludehtmltemplate\src folder:

    create new folder angular 7

    3. Now create new file named includehtmlfile.html inside angularincludehtmltemplate\src\views folder:

    create new file angular 7

    4. Now add any text inside angularincludehtmltemplate\src\views\includehtmlfile.html file:

    WOW!!
    includehtmlfile.html file has been included.

    5. Now add below code into app.component.ts file:

    import { Component } from '@angular/core';
    import Html from "../views/includehtmlfile.html";  // Html file text import
    @Component({
      selector: 'app-root',
      templateUrl: './app.component.html',
      styleUrls: ['./app.component.css']
    })
    export class AppComponent {
      title = 'angularincludehtmltemplate';
      test = Html;
    }

    After add import Html from “../views/includehtmlfile.html”; code into your app.component.ts file, you will get error like below image:

    angular error

    6. To overcome with above error, need to add below code into angularincludehtmltemplate\src\typings.d.ts file:

    If you don’t get this file in Angular new version the please create into scr folder:

    /* SystemJS module definition */
    declare module '*html'
    {
      const value:string;
      export default value
    }

    7. Now add below code into app.component.html file:

    <div style="text-align:center">
      <h1>
        Welcome to {{ title }}!
      </h1>
      <img width="300" alt="Angular Logo" src="data:image/svg+xml;base64,PHN2ZyB4bWxucz0iaHR0cDovL3d3dy53My5vcmcvMjAwMC9zdmciIHZpZXdCb3g9IjAgMCAyNTAgMjUwIj4KICAgIDxwYXRoIGZpbGw9IiNERDAwMzEiIGQ9Ik0xMjUgMzBMMzEuOSA2My4ybDE0LjIgMTIzLjFMMTI1IDIzMGw3OC45LTQzLjcgMTQuMi0xMjMuMXoiIC8+CiAgICA8cGF0aCBmaWxsPSIjQzMwMDJGIiBkPSJNMTI1IDMwdjIyLjItLjFWMjMwbDc4LjktNDMuNyAxNC4yLTEyMy4xTDEyNSAzMHoiIC8+CiAgICA8cGF0aCAgZmlsbD0iI0ZGRkZGRiIgZD0iTTEyNSA1Mi4xTDY2LjggMTgyLjZoMjEuN2wxMS43LTI5LjJoNDkuNGwxMS43IDI5LjJIMTgzTDEyNSA1Mi4xem0xNyA4My4zaC0zNGwxNy00MC45IDE3IDQwLjl6IiAvPgogIDwvc3ZnPg==">
    </div>
    <h2>Here are some links to help you start: </h2>
    <!--Import Content Code -->
    <div [innerHtml] = 'test'></div>

    7. Now run ng serve command into your terminal and you will get below output:

    If you have any query related to this post then comment below or ask question.

    Harjas,

    Thank you

  • Angular 7 Google Maps working example

    Angular 7 Google Maps working example

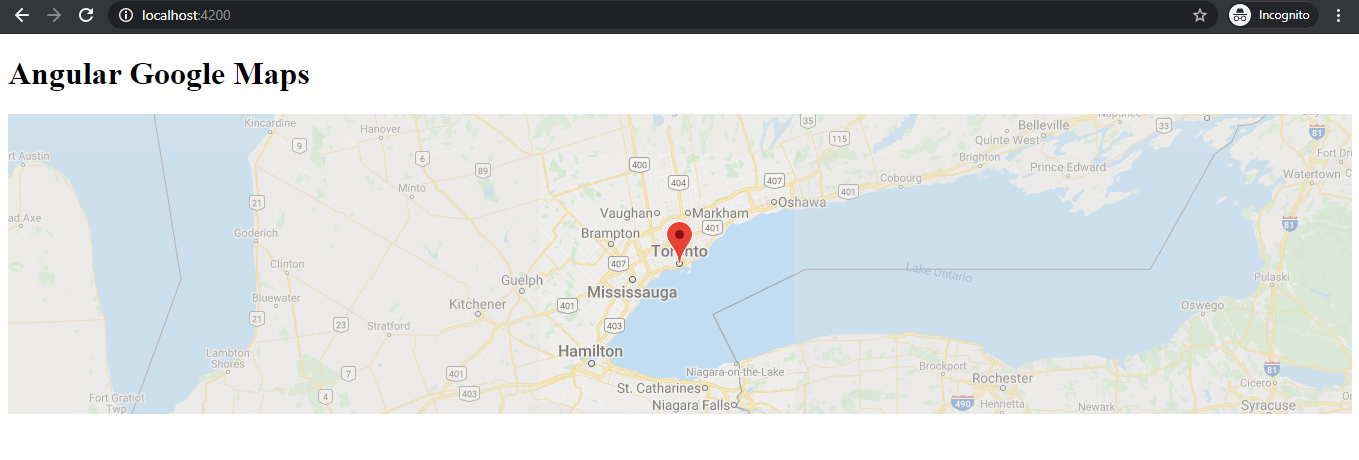
    Hello to all, welcome to therichpost.com. In this post, I will tell you, Angular 7 Google Maps working example.

    If you are new in Angular 7 then you can post related to Angular 7.

    Google Map and Angular are both developed by Google and both are amazing and both are popular.

    Here is the code snippet for Angular 7 Google Maps working example and please follow all the steps carefully:


    1. Very first, you need to run below commands into your terminal to install fresh Angular 7  setup:

    $ ng new angular7googlemaps //Install Angular setup
    
    $ cd angular7googlemaps // Go inside Angular project
    
    $ ng serve // execute angular
    
    http://localhost:4200/ //run into your browser


    2. Now add below code into your  app.component.ts file:

    import { Component, OnInit } from '@angular/core';
    declare var google;
    @Component({
      selector: 'app-root',
      templateUrl: './app.component.html',
      styleUrls: ['./app.component.css']
    })
    export class AppComponent {
      title = 'angular7googlemaps';
      ngOnInit()
      {
      	 google.charts.load('current', {
            'packages':['geomap'],
            // Note: you will need to get a mapsApiKey for your project.
            // See: https://developers.google.com/chart/interactive/docs/basic_load_libs#load-settings
            'mapsApiKey': 'AIzaSyD-9tSrke72PouQMnMX-a7eZSW0jkFMBWY'
          });
          google.charts.setOnLoadCallback(drawRegionsMap);
          function drawRegionsMap() {
            var data = google.visualization.arrayToDataTable([
                ['Regions', 'Popularity'],
                ['New York', 200],
                ['Texas', 500],
                ['California', 600]
                
            ]);
             var options = {};
             options['region'] = 'US';
             options['resolution'] = 'provinces';
             
            var chart = new google.visualization.GeoChart(document.getElementById('regions_div'));
            chart.draw(data, options);
          }
      }
    }


    3. Now add below code into app.component.html file:

    <!--The content below is only a placeholder and can be replaced.-->
    <div style="text-align:center">
      <h1>
        Welcome to {{ title }}!
      </h1>
       <div id="regions_div" style="width: 900px; height: 500px;"></div>
    </div>


    4. Now run ng serve command into your terminal and you will  see below error:

    Oops, you will get ERROR ReferenceError: google is not defined error missing something so to over come to this error, need to run check 5th point.


    5. Now add below script into your angular7googlemaps\src\index.html file:

    <script type="text/javascript" src="https://www.gstatic.com/charts/loader.js"></script>


    Now you are done, if you have any query related to this post, then please do comment or ask question.

    Harjas

    Thank you

  • Angular 7 open Bootstrap 4 modal popup with dynamic data on click on Bootstrap 4 table row

    Angular 7 open Bootstrap 4 modal popup with dynamic data on click on Bootstrap 4 table row

    Hello to all, welcome to therichpost.com. In this post, I will tell you, Angular 7 open Bootstrap 4 modal popup with dynamic data on click on Bootstrap 4 table row.

    If you are new in Angular 7 then you can check my old Angular 7 posts.

    Now I will come to the main point and here is the code snippet for Angular 7 open Bootstrap 4 modal popup with dynamic data on click on Bootstrap 4 table row:


    1. Very first, you need to add Bootstrap into your Angular Application so please follow the below link:

    https://therichpost.com/add-bootstrap-to-angular-7


    2. Now add below code into your app.component.ts file:

    import { Component, OnInit } from '@angular/core';
    
    @Component({
      selector: 'app-root',
      templateUrl: './app.component.html',
      styleUrls: ['./app.component.css']
    })
    export class AppComponent {
      showModal : boolean;
      UserId    : string;
      Firstname : string;
      Lastname  : string;
      Email     : string;
      
      onClick(event)
      {
        this.showModal = true; // Show-Hide Modal Check
          this.UserId = event.target.id;
          this.Firstname = document.getElementById("firstname"+this.UserId).innerHTML;
          this.Lastname = document.getElementById("lastname"+this.UserId).innerHTML;
          this.Email = document.getElementById("email"+this.UserId).innerHTML;
    
      }
      //Bootstrap Modal Close event
      hide()
      {
        this.showModal = false;
      }
    }


    3. Now add below code into your app.component.html file:

    <div class="container">
      <h2>Basic Table</h2>
      <p>Angular 7 open bootstrap 4 modal popup with dynamic data on click on bootstrap table row</p>            
      <table class="table table-hover">
        <thead>
          <tr>
            <th>Firstname</th>
            <th>Lastname</th>
            <th>Email</th>
            <th>Action</th>
          </tr>
        </thead>
        <tbody>
          <tr class="table-primary">
            <td id="firstname1">John</td>
            <td id="lastname1">Doe</td>
            <td id="email1">john@example.com</td>
            <td id="1" (click)="onClick($event)" style="cursor: pointer;font-weight: bold;">Show</td>
    
          </tr>
          <tr class="table-success">
            <td id="firstname2">Mary</td>
            <td id="lastname2">Moe</td>
            <td id="email2">mary@example.com</td>
            <td id="2" (click)="onClick($event)" style="cursor: pointer;font-weight: bold;">Show</td>
          </tr>
          <tr class="table-danger">
            <td id="firstname3">July</td>
            <td id="lastname3">Dooley</td>
            <td id="email3">july@example.com</td>
            <td id="3" (click)="onClick($event)" style="cursor: pointer;font-weight: bold;">Show</td>
          </tr>
        </tbody>
      </table>
    
      <!-- The Modal -->
      <div class="modal" id="myModal" [style.display]="showModal ? 'block' : 'none'">
        <div class="modal-dialog">
          <div class="modal-content">
          
            <!-- Modal Header -->
            <div class="modal-header">
              <h4 class="modal-title">User Details:</h4>
              <button type="button" class="close" data-dismiss="modal" (click) = "hide()">&times;</button>
            </div>
            
            <!-- Modal body -->
            <div class="modal-body">
             <p>User Id : {{UserId}}</p>
             <p>Firstname : {{Firstname}}</p>
             <p>Lastname : {{Lastname}}</p>
             <p>Email : {{Email}}</p>
            </div>
            
            <!-- Modal footer -->
            <div class="modal-footer">
              <button type="button" class="btn btn-danger" data-dismiss="modal" (click) = "hide()">Close</button>
            </div>
            
          </div>
        </div>
      </div>
    </div>


    If you have any query related to this post, then do comment below or ask question.

    Harjas,

    Thank you

  • How to Get WordPress post by Taxonomy Category id?

    How to Get WordPress post by Taxonomy Category id?

    Hello to all, welcome to therichpost.com. In this post, I will tell you, How to Get WordPress post by Taxonomy Category id?

    If you are new in wordpress then you can check my post related to WordPress.

    In these day, I am busy with other programing things like Laravel, Vue and Angular.

    But I can still say, WordPress is my favorite.

    Here I am going to show code snippet for How to Get WordPress post by Taxonomy Category id?:


    1. Here is the code and you can add into any of your wordpress them’s template:

    $catid = get_term_by( 'slug', 'cat-slug', 'Taxnomyname' );
    $args = array(
    'posts_per_page'   => -1,
    'offset'           => 0,
    'tax_query'  => array(array(
    'taxonomy' => 'Taxnomyname',
    'field' => 'term_id',
    'terms' => $catid->term_id
    )),
    'orderby'          => 'date',
    'order'            => 'DESC',
    'post_type'        => 'match',
    'post_status'      => 'publish'
    );
    $events = get_posts( $args );


    If you have any query related to this post, then do comment below or ask question.

    Harjas

    Thank you

  • How to set and get div attribute value on button click in Angular 7?

    How to set and get div attribute value on button click in Angular 7?

    Hello to all, welcome to therichpost.com. In this post, I will tell you, How to set and get div attribute value on button click in Angular 7?

    If you are new in Angular 7, then you can check my old post to familiar with Angular 7.

    I am getting and setting div attribute value with simple Javascript getAttribute and setAttribute method and this seems very easy.


    How to set and get div attribute value on button click in Angular 7?

    Here I am going show you working code snippet please follow be carefully:


    1. Here is the code, you can add into your component html file like I added into app.component.html file:

    For looking good, I just added bootstrap CDN, but you can remove this or you want to add bootstrap into you Angular 7 application, then please follow this post Add Bootstrap to Angular 7.

    <link rel="stylesheet" href="https://maxcdn.bootstrapcdn.com/bootstrap/3.3.7/css/bootstrap.min.css">
    <div class="jumbotron text-center" data-id="2">
      <h1>Attribute value is :</h1>
      <h3>{{ attrval }}</h3> 
    </div>
    how to set and get div attribute value on button click in Angular 7
    http://prntscr.com/m8a4bj
    <div class="container">
      <div class="btn-group">
        <button (click)="getVal()" type="button" class="btn btn-primary">Get Div Attribute Value</button>
        <button (click)="setVal()" type="button" class="btn btn-primary">Set Div Attribute Value</button>
      </div>
    </div>

    2. Here is the code, you need to add your component.ts file like I added into app.component.ts file:

    import { Component, OnInit } from '@angular/core';
    
    @Component({
      selector: 'app-root',
      templateUrl: './app.component.html',
      styleUrls: ['./app.component.css']
    })
    export class AppComponent {
      title = 'angulartricks';
      attrval : any;
      
      getVal(){
      	var x = document.getElementsByClassName("jumbotron")[0].getAttribute("data-id");
      	alert(x);
      }
    
      setVal(){
      	document.getElementsByClassName("jumbotron")[0].setAttribute("data-id", "3");
      	this.attrval = document.getElementsByClassName("jumbotron")[0].getAttribute("data-id");
      }
    
      ngOnInit()
      {
      	this.attrval = document.getElementsByClassName("jumbotron")[0].getAttribute("data-id");
      }
    }


    If you have any query related to this post then you can comment below or you can ask question.

    Harjas,

    Thank you

  • How to share data between two Components in Angular 7?

    How to share data between two Components in Angular 7?

    Hello to all, welcome to therichpost.com. Today, I am going to tell you, How to share data between two Components in Angular 7?

    If you are new in Angular 7, then you can check my old post related to Angular 7.

    I am trying this first time and this is very interesting sharing data between Angular 7 components.

    I have mainly used two things in this:

    1. Services:
      • I have added custom json data in it and call this Service to Angular Components.
    2. LocalStorage:
      • This is my trick, I have saved component data in it and share one component data into other component with help of localstorage.

    Here I am sharing the code and you need to add this into your Angular 7 App:


    1. Very first, you need to run common below commands to add Angular 7 project on your machine:

    $ npm install -g @angular/cli 
    
    $ ng new angularsharedata //Install Angular Project
    
    $ cd angularsharedata // Go to project folder
    
    $ ng generate component component-second //create new component
    
    $ ng serve //Run Project
    
    http://localhost:4200/ //Run On local server

    2. After playing with above commands,  you can see folder structure into your src/app folder like below image:

    angular-app-folder-structure

    3. Now, you need to create app.service.ts file into src/app folder and below code into it:

    import { Injectable } from '@angular/core'; 
    @Injectable()
    export class appService {
    constructor() { }
          public posts = [
          {id: 1, firstname: 'Mary', lastname: 'Taylor', age: 24},
          {id: 2, firstname: 'Peter', lastname: 'Smith', age: 18},
          {id: 3, firstname: 'Lauren', lastname: 'Taylor', age: 31}
          ];
       }

    4. Now add below code into your app.module.ts file:

    import { BrowserModule } from '@angular/platform-browser';
    import { NgModule } from '@angular/core';
    import { Routes, RouterModule } from '@angular/router';
    import { AppComponent } from './app.component';
    import { ComponentSecondComponent } from './component-second/component-second.component';
    const appRoutes: Routes = [
        { path: 'componentsecondcomponent', component: ComponentSecondComponent }
    ];
    @NgModule({
      declarations: [
        AppComponent,
        ComponentSecondComponent
      ],
      imports: [
        BrowserModule,
         RouterModule.forRoot(appRoutes),
      ],
      providers: [],
      bootstrap: [AppComponent]
    })
    export class AppModule {}

    5. Now add below code into app.component.ts file:

    import { Component,OnInit  } from '@angular/core';
    import { appService } from './app.service';
    
    @Component({
      selector: 'app-root',
      templateUrl: './app.component.html',
      styleUrls: ['./app.component.css'],
      providers: [appService] 
    })
    
    export class AppComponent {
      title = 'angulardata';
      public data:any;
        constructor(private appservice: appService) {} 
        ngOnInit() {
         this.appservice.posts.push({id: 4, firstname: 'Linda', lastname: 'Maria', age: 30});
         this.data = this.appservice.posts;
         localStorage.setItem("GlobalData",JSON.stringify(this.data));
         console.log(this.appservice.posts);
        }
      
    }

    6. Now add below code into app.component.html file:

    <h1>
      Welcome to {{ title }}!
    </h1>
    <router-outlet></router-outlet>

    7. Now add below code into src\app\component-second\component-second.component.ts file:

    import { Component, OnInit } from '@angular/core';
    @Component({
      selector: 'app-component-second',
      templateUrl: './component-second.component.html',
      styleUrls: ['./component-second.component.css']
    })
    export class ComponentSecondComponent implements OnInit {
      data:any;
      constructor() {} 


      ngOnInit() {
      	 this.data = JSON.parse(localStorage.getItem('GlobalData'));
      	 console.log(this.data);
      }
    }

    8. Now add below code into src\app\component-second\component-second.component.html file:

    <h1>Customer List</h1>
    <ul>
      <li *ngFor="let customer of data">
        {{ customer.firstname}}
      </li>
    </ul>

    Now run ng serve command and run http://localhost:8000/componentsecondcomponent into your browser and you will see the output like below image:

    How to share data between two Components in Angular 7

    This is done, if you have any query or any have any question then you can comment below.

    Harjas

    Thank you

    Notes: I learnt from this post is that, we can share or we can move all data between the components with the help of LocalStorage.

  • Angular 7 Laravel Auth Login working example Part 1

    Angular 7 Laravel Auth Login working example Part 1

    Hello to all, welcome to therichpost.com. In this post, I will tell you, Angular Laravel Auth Login working example Part 1.

    Angular & laravel both are in very high demand and according to popularity both are on same level.

    If you are new in Angular and laravel, then please check my olds posts related to Angular and laravel.

    I am making Angular laravel Auth Login into two parts. In first part means in this part, I will make login form in Angular and applied validations on it and make it ready for interact with Laravel Auth.


    Form is ready to fill:

    Angular Laravel Auth Login working example Part 1

    Form With validation:

    Angular Laravel Auth Login form validation

    Here I am going to give you working coding snippets for
    Angular Laravel Auth Login working example Part 1 :


    1. Very first, you need to run common below commands to add Angular 7 project on your machine:

    $ npm install -g @angular/cli 
    
    $ ng new angularlaravelauth //Install Angular Project
    
    $ cd angularlaravelauth // Go to project folder
    
    $ ng serve //Run Project
    
    http://localhost:4200/ //Run On local server

    2. Also check below reference link to add bootstrap into your Angular 7 App:

    Add Bootstrap in Angular


    3. After done with above setting, add below code into your app.module.ts file:

    import { BrowserModule } from '@angular/platform-browser';
    import { NgModule } from '@angular/core';
    import { FormsModule, ReactiveFormsModule } from '@angular/forms';
    import { AppComponent } from './app.component';
    
    @NgModule({
      declarations: [
        AppComponent
      ],
      imports: [
        BrowserModule,
        FormsModule,
        ReactiveFormsModule
      ],
      providers: [],
      bootstrap: [AppComponent]
    })
    export class AppModule { }

    4. Now add below code into app.component.ts file:

    This is the component file and in this file, we will interact with form and form data and form validation and in second past of this post, I will send form data to Laravel :

    import { Component, OnInit } from '@angular/core';
    import { FormGroup, FormControl, Validators} from '@angular/forms';
    @Component({
      selector: 'app-root',
      templateUrl: './app.component.html',
      styleUrls: ['./app.component.css']
    })
    export class AppComponent {
      formdata;
      title = 'angularlaravelauth';
       onClickSubmit(data) {
       	 if(this.formdata.invalid)
       	{
      		this.formdata.get('email').markAsTouched();
        this.formdata.get('password').markAsTouched();
      	}
      	else
      	{
      		alert("Now you are done with angularauthlign Part 1.");
      }
      }
    
      ngOnInit() {
      	  /*Login form validation*/
      	  this.formdata = new FormGroup({
             email: new FormControl("", Validators.compose([
                Validators.required,
                Validators.pattern("[^ @]*@[^ @]*")
             ])),
            password: new FormControl("", this.passwordvalidation)
            
          });
      }
    
      passwordvalidation(formcontrol) {
          if (formcontrol.value.length < 5) {
             return {"password" : true};
          }
       }
    }

    5. Add below code into app.component.html file:

    In this, I have used Bootstrap form and applied angular form data binding:

    <div class="jumbotron text-center">
      <h1>{{ title }}!</h1>
      <p>{{ title }}</p> 
    </div>
    
    <div class="container">
        <form [formGroup] = "formdata" (ngSubmit) = "onClickSubmit(formdata.value)">
          <div class="form-group">
            <label for="email">Email address:</label>
            <input type="email" class="form-control" id="email" formControlName = "email">
            <div *ngIf="formdata.controls.email.errors && formdata.controls.email.touched" class="error">Email not valid</div>
          </div>
          <div class="form-group">
            <label for="pwd">Password:</label>
            <input type="password" class="form-control" id="pwd" formControlName="password">
            <div *ngIf="formdata.controls.password.errors && formdata.controls.password.touched" class="error">Minimum length 5</div>
          </div>
          <button type="submit" class="btn btn-primary">Submit</button>
        </form>
    </div>


    6. Add Below code into src/styles.css file:

    .error{color: #b45b59;background: #f2dede;padding: 5px;border-radius: 0 0 5px 5px;}

    Now this is all done with Angular 7 Laravel Auth Login working example Part 1 and if you have some improvement tips for me or you have any query then you can comment below.

    Thank you,

    Harjas,

    TheRichPost

  • Javascript FullCalendar with custom Filters

    Javascript FullCalendar with custom Filters

    Hello to all, welcome to therichpost.com. In this post, I will tell you, Javascript FullCalendar with custom Filters.

    Javascript FullCalendar is very popular and I have shared many post related to FullCalendar.

    In this , I have also used Bootstrap, JqueryUI. This is just example, on button click and jQuery UI range selector events, you can check the FullCalendar changing behaviour.


    Javascript FullCalendar with custom Filters

    Here is the working code and you can add this into your html or any other file;

    <!DOCTYPE html>
    <html>
    <head>
    <meta charset='utf-8' />
    <link rel="stylesheet" href="https://maxcdn.bootstrapcdn.com/bootstrap/4.1.3/css/bootstrap.min.css">
    <link href='https://fullcalendar.io/releases/fullcalendar/3.9.0/fullcalendar.min.css' rel='stylesheet' />
    <link href='https://fullcalendar.io/releases/fullcalendar/3.9.0/fullcalendar.print.min.css' rel='stylesheet' media='print' />
    <script src='https://fullcalendar.io/releases/fullcalendar/3.9.0/lib/moment.min.js'></script>
    <script src='https://fullcalendar.io/releases/fullcalendar/3.9.0/lib/jquery.min.js'></script>
    <script src='https://fullcalendar.io/releases/fullcalendar/3.9.0/fullcalendar.min.js'></script>
    <link rel="stylesheet" href="https://code.jquery.com/ui/1.12.1/themes/base/jquery-ui.css">
    <script src="https://code.jquery.com/ui/1.12.1/jquery-ui.js"></script>
    <script>
    
      $(document).ready(function() {
    
        /*Month Range*/
        $( "#slider-range-max" ).slider({
          range: "max",
          min: 1,
          max: 12,
          value: 0,
          slide: function( event, ui ) {
            $( "#amount" ).val( ui.value );
            $('#calendar').fullCalendar('changeView', 'month', ui.value);
            $('#calendar').fullCalendar('gotoDate', "2019-"+ui.value+"-1");
          }
        });
        $( "#amount" ).val( $( "#slider-range-max" ).slider( "value" ) );
    
        /*Click On Months*/
        $(".months li").on("click", function(event) {
         $('#calendar').fullCalendar('changeView', 'month', $(this).attr("id"));
         $('#calendar').fullCalendar('gotoDate', "2019-"+$(this).attr("id")+"-1");
         });
    
    
        /*Select On Months*/
         $(".select_month").on("change", function(event) {
           $('#calendar').fullCalendar('changeView', 'month', this.value);
           $('#calendar').fullCalendar('gotoDate', "2019-"+this.value+"-1");
         });
    
        /*FullCalendar Implemetation */
        $('#calendar').fullCalendar({
          header: {
            left: 'prev,next',
            center: 'title',
            right: 'today'
          },
          defaultDate: new Date(),
          navLinks: true, // can click day/week names to navigate views
          editable: true,
          eventLimit: true, // allow "more" link when too many events
          events: [{
              title: 'All Day Event',
              start: '2019-01-12'
            }]
        });
    
        /*Buttons click*/
        $(".btn").on('click', function(event) {
          $('#calendar').fullCalendar('changeView', $(this).attr("id"));
        });
    
      });
    
    </script>
    <style type="text/css">
      .months li, #slider-range-max .ui-state-hover{cursor: pointer;}
    </style>
    </head>
    <body>
      <div class="jumbotron text-center">
        <h1>Full-Calendar with Filters</h1>
        <p>Here you can check Full-Calendar with Filters!</p> 
      </div>
      <div class="container">
        <div class="row">
          <div class="col-sm-4">
             <h4>Filter with List:</h4>
             <ul class="list-group months">
                <li class="list-group-item list-group-item-success" id="1">Jan 2019</li>
                <li class="list-group-item list-group-item-danger" id="2">Feb 2019</li>
             </ul>
    
             <br>
             <h4>Filter with Select Options:</h4>
               <select name="cars" class="custom-select-lg select_month" style="width: 100%">
                <option selected>Select Month</option>
                <option value="1">Jan 2019</option>
                <option value="2">Feb 2019</option>
              </select>
    
              <br><br>
              <h4>Filter with Range:</h4>
              
              <label for="amount">Month:</label>
              <input type="text" id="amount" readonly style="border:0; color:#f6931f; font-weight:bold;">
              
             <div id="slider-range-max"></div>
    
             <br>
             <h4>Filter with Buttons:</h4>
              <button type="button" class="btn btn-danger" id="month">Month</button>
              <button type="button" class="btn btn-primary" id="agendaDay">Day</button>
              <button type="button" class="btn btn-success" id="agendaWeek">Week</button>
             </div>
    
            <div class="col-sm-8">
            <div id='calendar'></div>
          </div>
        </div>
      </div>
      <div class="jumbotron text-center" style="margin-bottom:0">
        <p>Footer</p>
      </div>
    </body>
    </html>


    If you have any query related to this post or you want more advance level fullCalendar, then you can comment below or ask question.

    Harjas

    TheRichPost

  • How to show Google Map for particular Country with selected Provinces?

    How to show Google Map for particular Country with selected Provinces?

    Hello to all, welcome to therichpost.com. Today In this post, I will show, How to show Google Map for particular Country with selected Provinces?

    If you new in Google map or you want know more about it then you can check my posts related to Google Maps.

    This post is very interesting and I am hoping, you will all like this also very much.

    How to show Google Map for particular Country with selected Provinces

    Here is the working code and you can add this into your html file:

    <html>
      <head>
        <script type="text/javascript" src="https://www.gstatic.com/charts/loader.js"></script>
        <script type="text/javascript">
          google.charts.load('current', {
            'packages':['geomap'],
            // Note: you will need to get a mapsApiKey for your project.
            // See: https://developers.google.com/chart/interactive/docs/basic_load_libs#load-settings
            'mapsApiKey': 'AIzaSyD-9tSrke72PouQMnMX-a7eZSW0jkFMBWY'
          });
          google.charts.setOnLoadCallback(drawRegionsMap);
    
          function drawRegionsMap() {
            var data = google.visualization.arrayToDataTable([
                ['Regions', 'Popularity'],
                ['New York', 200],
                ['Texas', 500],
                ['California', 600]
                
            ]);
    
             var options = {};
             options['region'] = 'US';
             options['resolution'] = 'provinces';
             
    
            var chart = new google.visualization.GeoChart(document.getElementById('regions_div'));
    
            chart.draw(data, options);
          }
        </script>
      </head>
      <body>
        <div id="regions_div" style="width: 900px; height: 500px;"></div>
      </body>
    </html>

    If you have any query or you want more advance code related to this, then you can comment below or ask question.

    Thank you,

    Harjas,

    TheRichPost

  • How to implement Fullcalendar in Vue Laravel with dynamic Events?

    How to implement Fullcalendar in Vue Laravel with dynamic Events?

    Hello dev’s, welcome to therichpost.com. In this post, I will tell you, How to implement Fullcalendar in Vue Laravel with dynamic Events?

    I have wrote many posts related to full-calendar and Now I will implement full-calendar in Vue Laravel with dynamic data from laravel controller and this is interesting.

    If you are new in Laravel Vue then you can check my previous post for basic information related to Vue Laravel.

    Here is the working and tested coding steps for implement Fullcalendar in Vue Laravel:


    1. Here are the basics command to install fresh laravel setup on your machine:

    $ composer create-project --prefer-dist laravel/laravel blogvuefullcalendar
    
    $ cd blogvuefullcalendar

    2. Now here are the some npm commands you need to run into your terminal to install node module and fullcalendar:

    $ npm install //install node modules
    
    $ npm install --save vue-full-calendar //install full calendar
    
    $ npm install --save babel-runtime //full calendar dependency
    
    $ npm install babel-preset-stage-2 --save-dev //full calendar dependency

    3. Now, you need to add below code into resources\js\app.js file:

    /**
     * First we will load all of this project's JavaScript dependencies which
     * includes Vue and other libraries. It is a great starting point when
     * building robust, powerful web applications using Vue and Laravel.
     */
    
    require('./bootstrap');
    import 'fullcalendar/dist/fullcalendar.css';
    window.Vue = require('vue');
    import axios from 'axios';
    Vue.use(axios);
    import FullCalendar from 'vue-full-calendar'; //Import Full-calendar
    Vue.use(FullCalendar);
    /**
     * Next, we will create a fresh Vue application instance and attach it to
     * the page. Then, you may begin adding components to this application
     * or customize the JavaScript scaffolding to fit your unique needs.
     */
    
    Vue.component('example-component', require('./components/ExampleComponent.vue'));
    
    const app = new Vue({
        el: '#app'
    });
    

    4. Now, you need to add below code into resources\js\components\ExampleComponent.vue file:

    <template>
    <div class="container">
    <center><h1>Vue laravel Full-Calendar</h1></center>
           <full-calendar :event-sources="eventSources"></full-calendar>
           </div>
    </template>
    <script>
        export default{
      data() {
        return {
          eventSources: [
            {
              events(start, end, timezone, callback) {
                axios.get('http://localhost:8000/events').then(response => {
                  callback(response.data.calendardata)
                })
              },
              color: 'yellow',
              textColor: 'black',
            }
          ]
        }
      }
        }
    </script>
    

    5. Now, you need to add below code into resources\views\welcome.blade.php file:

    <div id="app"><example-component></example-component></div>
    <script src="{{asset('js/app.js')}}"></script>

    6 Now you need to add below code into app\Http\Controllers\Controller.php file:

    public function Events(){
        $calendardata = array
                      (
                        "0" => array
                                  (
                                   "title" => "Event One",
                                   "start" => "2019-01-09",
                                   ),
                        "1" => array
                                   (
                                    "title" => "Event Two",
                                    "start" => "2019-01-06",
                                    )
                      );
        return response()->json(["calendardata" => $calendardata]);
      }

    7. Now you need to add below code into routes\web.php file:

    Route::get("/events", "Controller@Events");


    8. Finally, you need to run below command into your terminal and you will see working full calendar example:

    $ php artisan serve

    This is it. If you have any query related to this post, then do comment below or ask questions.

    Thank you,

    Ludhiane wala ajay,

    TheRichpost