
Hello friends, welcome back to my blog. Today in this blog post, I am going to tell you, Angular 11 Crud With Firebase Database.
Angular 11 came and if you are new then you must check below two links:
Here is the code snippet for Angular 11 Crud With Firebase Database and please use carefully and avoid the mistakes.:
1. Firstly friends we need fresh angular 11 setup and for this we need to run below commands but if you already have angular 11 setup then you can avoid below commands. Secondly we should also have latest node version installed on our system:
npm install -g @angular/cli //Setup Angular11 atmosphere

ng new angularcrud //Install New Angular App

/**You need to update your Nodejs also for this verison**/

cd angularcrud //Go inside the Angular 10 Project
2. Now guy’s we need to run below commands inside your angular project to install firebase , bootstrap, toast etc modules:
npm install bootstrap --save

npm i @fortawesome/fontawesome-free

npm install firebase @angular/fire --save

npm install ngx-toastr --save

npm install @angular/animations --save

npm install ngx-pagination --save
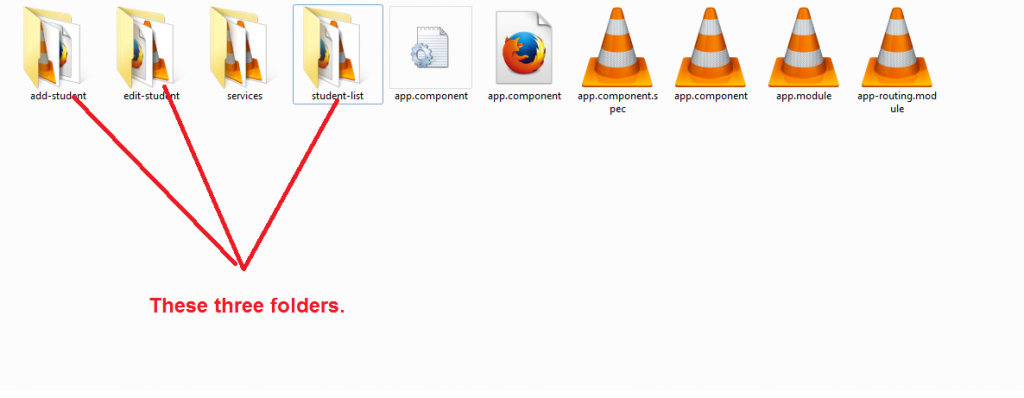
3. Now guy’s we need to run below commands into your angular project to create add, update and listing components:
ng g c add-student

ng g c edit-student

ng g c student-list
4. After run the above create component commands, you will see new folders into your app folder:
5. Now add below code into your angular.json file:
"styles": [
              ...
              "node_modules/bootstrap/dist/css/bootstrap.min.css",
              "node_modules/@fortawesome/fontawesome-free/css/all.css",
              "node_modules/ngx-toastr/toastr.css"
            ],
6. Now guy’s we need to add firebase configuration that I have shown you in above second video(create database on firebase) and you need to add that details in src/environments/environment.ts file:
export const environment = {
  production: false,
    firebaseConfig : {
    apiKey: "***",
    authDomain: "***",
    databaseURL: "***",
    projectId: "***",
    storageBucket: "***",
    messagingSenderId: "***",
    appId: "***",
    measurementId: "***"
  }
};
7. Now guy’s we nee to add or replace below code into your app.module.ts file:
import { BrowserModule } from '@angular/platform-browser';
import { NgModule } from '@angular/core';
import { AngularFireModule } from '@angular/fire';
import { AngularFireDatabaseModule } from '@angular/fire/database';
import { AngularFirestoreModule } from '@angular/fire/firestore';
import { AppComponent } from './app.component';
import { environment } from 'src/environments/environment';
import { AddStudentComponent } from './add-student/add-student.component';
import { StudentListComponent } from './student-list/student-list.component';
import { EditStudentComponent } from './edit-student/edit-student.component';
import { FormsModule, ReactiveFormsModule } from '@angular/forms';
import { BrowserAnimationsModule } from '@angular/platform-browser/animations';
// NGX Pagination
import { NgxPaginationModule } from 'ngx-pagination';
import { ToastrModule } from 'ngx-toastr';
import { RouterModule, Routes } from '@angular/router';

// Routes array define component along with the path name for url
const routes: Routes = [
  { path: '', redirectTo: '/register-student', pathMatch: 'full' },
  { path: 'register-student', component: AddStudentComponent },
  { path: 'view-students', component: StudentListComponent },
  { path: 'edit-student/:id', component: EditStudentComponent }
];

@NgModule({
  declarations: [
    AppComponent,
    AddStudentComponent,
    EditStudentComponent,
    StudentListComponent
  ],
  imports: [
    BrowserModule,
    FormsModule,
    ReactiveFormsModule,

    AngularFireModule.initializeApp(environment.firebaseConfig),
    AngularFireDatabaseModule,
    AngularFirestoreModule,
    BrowserAnimationsModule, // required animations module
    NgxPaginationModule,
    ToastrModule.forRoot(),
    RouterModule.forRoot(routes)
  ],
  providers: [],
  bootstrap: [AppComponent]
})
export class AppModule { }
8. Now guy’s we need to add below code into your app.component.html file:
<!-- Top navigation -->
<nav class="navbar navbar-dark fixed-top bg-dark flex-md-nowrap p-0 shadow">
  <a class="navbar-brand col-sm-3 col-md-2 mr-0" routerLink="/register-student">

    <span class="dasboard-text">Therichpost</span>
  </a>
  <ul class="navbar-nav px-3">
    <li class="nav-item text-nowrap">
      <a class="nav-link" routerLink="/register-student">
        <span class="user-image" style="background-image: url('assets/user.jpg')"></span>
        Hello Ajay
      </a>
    </li>
  </ul>
</nav>

<!-- Sidebar navigation -->
<div class="container-fluid">
  <div class="row">
    <nav class="col-md-2 d-md-block bg-light sidebar" style="margin-top: 70px;">
      <div class="sidebar-sticky">
        <ul class="nav flex-column">

          <!-- routerLink="/register-student" to navigate to view-students component -->
          <li class="nav-item">
            <a class="nav-link" routerLink="/register-student" routerLinkActive="active">
              <i class="fas fa-plus"></i>Add Student
            </a>
          </li>

          <!-- routerLink="/view-students" to navigate to view-students component -->
          <!-- routerLinkActive="active" activates active class for component-->
          <li class="nav-item">
            <a class="nav-link" routerLink="/view-students" routerLinkActive="active">
              <i class="fas fa-list-ul"></i>Students List
            </a>
          </li>
        </ul>
      </div>
    </nav>

    <!-- Main content -->
    <main role="main" style="margin-top: 50px;" class="col-md-9 ml-sm-auto col-lg-10 px-4">
      <div class="inner-adjust">

        <!-- Use router template to show the components for which router service is activated -->
        <router-outlet></router-outlet>

      </div>
    </main>

  </div>
</div>
9. First create services folder into your app folder and run below command:
ng g s services/crud
10. Now guy’s open your app/services/crud.service.ts file and below code into it:
import { Injectable } from '@angular/core';

import { AngularFireDatabase, AngularFireList, AngularFireObject } from '@angular/fire/database';  // Firebase modules for Database, Data list and Single object
export interface Student {
    $key: string;
    firstName: string;
    lastName: string;
    email: string
    mobileNumber: Number;
 }
@Injectable({
  providedIn: 'root'
})

export class CrudService {
  studentsRef: AngularFireList<any>;    // Reference to Student data list, its an Observable
  studentRef: AngularFireObject<any>;   // Reference to Student object, its an Observable too

  // Inject AngularFireDatabase Dependency in Constructor
  constructor(private db: AngularFireDatabase) { }

  // Create Student
  AddStudent(student: Student) {
    this.studentsRef.push({
      firstName: student.firstName,
      lastName: student.lastName,
      email: student.email,
      mobileNumber: student.mobileNumber
    })
  }

  // Fetch Single Student Object
  GetStudent(id: string) {
    this.studentRef = this.db.object('students-list/' + id);
    return this.studentRef;
  }

  // Fetch Students List
  GetStudentsList() {
    this.studentsRef = this.db.list('students-list');
    return this.studentsRef;
  }

  // Update Student Object
  UpdateStudent(student: Student) {
    this.studentRef.update({
      firstName: student.firstName,
      lastName: student.lastName,
      email: student.email,
      mobileNumber: student.mobileNumber
    })
  }

  // Delete Student Object
  DeleteStudent(id: string) {
    this.studentRef = this.db.object('students-list/'+id);
    this.studentRef.remove();
  }

}
11. Now guy’s open your app/add-student/add-student.component.ts file and add below code into it:
import { Component, OnInit } from '@angular/core';
import { CrudService } from '../services/crud.service';    // CRUD services API
import { FormBuilder, FormGroup, FormControl, Validators } from '@angular/forms'; // Reactive form services
import { ToastrService } from 'ngx-toastr'; // Alert message using NGX toastr


@Component({
  selector: 'app-add-student',
  templateUrl: './add-student.component.html',
  styleUrls: ['./add-student.component.css']
})

export class AddStudentComponent implements OnInit {

  public studentForm: FormGroup;  // Define FormGroup to student's form

  constructor(
    public crudApi: CrudService,  // CRUD API services
    public fb: FormBuilder,       // Form Builder service for Reactive forms
    public toastr: ToastrService  // Toastr service for alert message
  ) { }


  ngOnInit() {
    this.crudApi.GetStudentsList();  // Call GetStudentsList() before main form is being called
    this.studenForm();              // Call student form when component is ready
  }

  // Reactive student form
  studenForm() {
    this.studentForm = this.fb.group({
      firstName: ['', [Validators.required, Validators.minLength(2)]],
      lastName: [''],
      email: ['', [Validators.required, Validators.pattern('^[a-zA-Z0-9_.+-]+@[a-zA-Z0-9-]+.[a-zA-Z0-9-.]+$')]],
      mobileNumber: ['', [Validators.required, Validators.pattern('^[0-9]+$')]]
    })
  }

  // Accessing form control using getters
  get firstName() {
    return this.studentForm.get('firstName');
  }

  get lastName() {
    return this.studentForm.get('lastName');
  }

  get email() {
    return this.studentForm.get('email');
  }

  get mobileNumber() {
    return this.studentForm.get('mobileNumber');
  }

  // Reset student form's values
  ResetForm() {
    this.studentForm.reset();
  }

  submitStudentData() {
    this.crudApi.AddStudent(this.studentForm.value); // Submit student data using CRUD API
    this.toastr.success(this.studentForm.controls['firstName'].value + ' successfully added!'); // Show success message when data is successfully submited
    this.ResetForm();  // Reset form when clicked on reset button
   };

}
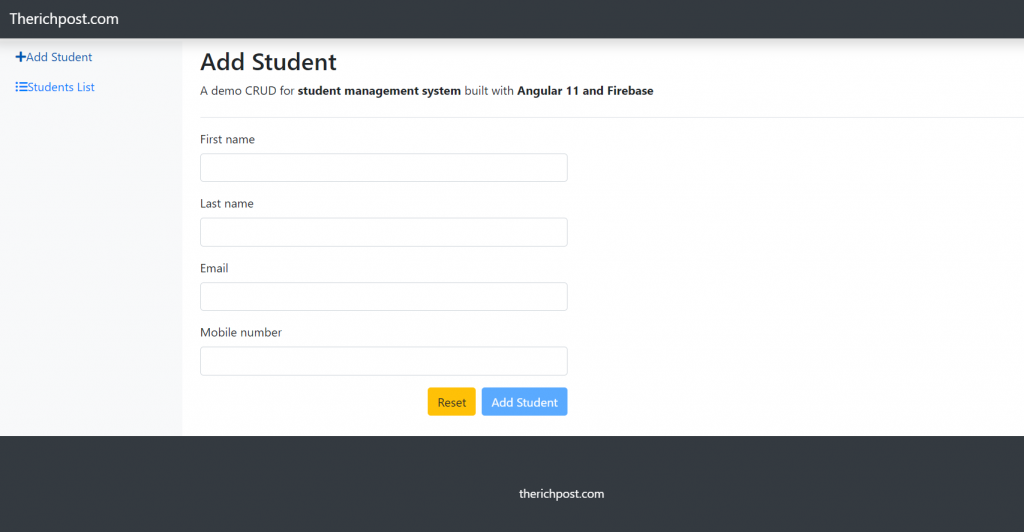
12. Now open your app/add-student/add-student.component.html file and add below code into it:
<div class="pt-3 pb-2 mb-3 border-bottom">
    <h1 class="h2">Add Student</h1>
    <p class="custom-text">A demo CRUD  for <strong>student management system</strong> built with <strong>Angular 10
        and Firebase</strong></p>
  </div>

  <!-- Student form -->
  <form [formGroup]="studentForm" (ngSubmit)="submitStudentData()" novalidate>
    <div class="row">
      <div class="col-lg-5 col-md-12 col-sm-12">
        <div class="row">

          <div class="col-md-12 mb-3">
            <label>First name</label>
            <input type="text" formControlName="firstName" class="form-control" required>
            <!-- Showing errors using getter method -->
            <p *ngIf="firstName.touched && firstName.invalid" class="error"><sup>*</sup>Please enter atleast first name</p>
            <p *ngIf="firstName.errors?.minlength" class="error"><sup>*</sup>Name shouldn't be less than 2 words</p>
          </div>

          <div class="col-md-12 mb-3">
            <label>Last name</label>
            <input type="text" formControlName="lastName" class="form-control">
          </div>

        </div>

        <div class="row">
          <div class="col-md-12 mb-3">
            <label>Email</label>
            <input type="email" formControlName="email" class="form-control" required>
            <!-- Showing errors using getter method -->
            <p *ngIf="email.touched && email.invalid" class="error"><sup>*</sup>Please provide email</p>
            <p *ngIf="email.errors?.pattern" class="error"><sup>*</sup>Please enter correct email</p>
          </div>

          <div class="col-md-12 mb-3">
            <label>Mobile number</label>
            <input type="text" formControlName="mobileNumber" class="form-control" required>
            <!-- Showing errors using getter method -->
            <p *ngIf="mobileNumber.touched && mobileNumber.invalid" class="error"><sup>*</sup>Please provide contact
              number</p>
            <p *ngIf="mobileNumber.errors?.pattern" class="error"><sup>*</sup>Use numbers only
              number</p>
          </div>

        </div>

        <div class="form-group text-right">
          <button type="button" class="btn btn-warning mr-2" (click)="ResetForm()">Reset</button>
          <button type="submit" class="btn btn-primary" [disabled]="!studentForm.valid">Add Student</button>
        </div>

      </div>
    </div>
  </form><!-- Student form ends-->
13. Now guy’s open your app/add-student/add-student.component.css file and add below code into it:
p.error {
    color: red;
}
14. Now open your app/edit-student/edit-student.component.ts file and add below code into it:
import { Component, OnInit, AfterViewInit } from '@angular/core';
import { FormGroup, FormBuilder, Validators } from '@angular/forms';
import { CrudService } from '../services/crud.service';
import { ActivatedRoute, Router } from "@angular/router"; // ActivatedRoue is used to get the current associated components information.
import { Location } from '@angular/common';  // Location service is used to go back to previous component
import { ToastrService } from 'ngx-toastr';

@Component({
  selector: 'app-edit-student',
  templateUrl: './edit-student.component.html',
  styleUrls: ['./edit-student.component.css']
})

export class EditStudentComponent implements OnInit {
  editForm: FormGroup;  // Define FormGroup to student's edit form

  constructor(
    private crudApi: CrudService,       // Inject CRUD API in constructor
    private fb: FormBuilder,            // Inject Form Builder service for Reactive forms
    private location: Location,         // Location service to go back to previous component
    private actRoute: ActivatedRoute,   // Activated route to get the current component's inforamation
    private router: Router,             // Router service to navigate to specific component
    private toastr: ToastrService       // Toastr service for alert message
  ){ }

  ngOnInit() {
    this.updateStudentData();   // Call updateStudentData() as soon as the component is ready
    const id = this.actRoute.snapshot.paramMap.get('id');  // Getting current component's id or information using ActivatedRoute service
    this.crudApi.GetStudent(id).valueChanges().subscribe(data => {
      this.editForm.setValue(data)  // Using SetValue() method, It's a ReactiveForm's API to store intial value of reactive form
    })
  }

  // Accessing form control using getters
  get firstName() {
    return this.editForm.get('firstName');
  }

  get lastName() {
    return this.editForm.get('lastName');
  }

  get email() {
    return this.editForm.get('email');
  }

  get mobileNumber() {
    return this.editForm.get('mobileNumber');
  }

  // Contains Reactive Form logic
  updateStudentData() {
    this.editForm = this.fb.group({
      firstName: ['', [Validators.required, Validators.minLength(2)]],
      lastName: [''],
      email: ['', [Validators.required, Validators.pattern('^[a-zA-Z0-9_.+-]+@[a-zA-Z0-9-]+.[a-zA-Z0-9-.]+$')]],
      mobileNumber: ['', [Validators.required, Validators.pattern('^[0-9]+$')]]
    })
  }

  // Go back to previous component
  goBack() {
    this.location.back();
  }

  // Below methods fire when somebody click on submit button
  updateForm(){
    this.crudApi.UpdateStudent(this.editForm.value);       // Update student data using CRUD API
    this.toastr.success(this.editForm.controls['firstName'].value + ' updated successfully');   // Show succes message when data is successfully submited
    this.router.navigate(['view-students']);               // Navigate to student's list page when student data is updated
  }

}
15. Now open your app/edit-student/edit-student.component.html file and add below code into it:
<div class="d-flex justify-content-between flex-wrap flex-md-nowrap align-items-center pt-3 pb-2 mb-3 border-bottom">
    <h1 class="h2">Edit Student Details</h1>
    <div class="btn-toolbar mb-2 mb-md-0">
       <div class="btn-group">
          <!-- goBack() methos to back to previous component -->
          <button class="btn btn-sm btn-outline-secondary" (click)="goBack()">Go Back</button>
       </div>
    </div>
 </div>


 <div class="row">
    <div class="col-lg-12">
       <div class="pricing-header form-block mx-auto">

          <!-- Student's Edit Form -->
          <form [formGroup]="editForm" (ngSubmit)="updateForm()" novalidate>
             <div class="row">
                <div class="col-lg-5 col-md-12 col-sm-12">
                   <div class="row">
                      <div class="col-md-12 mb-3">
                         <label>First name</label>
                         <input type="text" formControlName="firstName" class="form-control" required>
                         <p *ngIf="firstName.touched && firstName.invalid" class="error">
                             <sup>*</sup>Please enter firstname
                         </p>
                         <p *ngIf="firstName.errors?.minlength" class="error">
                             <sup>*</sup>Name shouldn't be less than 2 words
                         </p>
                      </div>
                      <div class="col-md-12 mb-3">
                         <label>Last name</label>
                         <input type="text" formControlName="lastName" class="form-control">
                      </div>
                   </div>
                   <div class="row">
                      <div class="col-md-12 mb-3">
                         <label>Email</label>
                         <input type="email" formControlName="email" class="form-control" required>
                         <p *ngIf="email.touched && email.invalid" class="error"><sup>*</sup>Please provide email</p>
                         <p *ngIf="email.errors?.pattern" class="error"><sup>*</sup>Please enter correct email</p>
                      </div>
                      <div class="col-md-12 mb-3">
                         <label>Mobile number</label>
                         <input type="text" formControlName="mobileNumber" class="form-control" required>
                         <p *ngIf="mobileNumber.touched && mobileNumber.invalid" class="error">
                            <sup>*</sup>Please provide contact number
                         </p>
                         <p *ngIf="mobileNumber.errors?.pattern" class="error">
                            <sup>*</sup>Use numbers only number
                         </p>
                      </div>
                   </div>
                   <div class="form-group text-right">
                      <button type="submit" class="btn btn-success btn-block" [disabled]="!editForm.valid">
                          Update Student
                      </button>
                   </div>
                </div>
             </div>
          </form>
          <!-- Student's Edit Form ends-->

       </div>
    </div>
 </div>
16. Now open your app/edit-student/edit-student.component.css file and add below code into it:
p.error { color: red; }
17. Now open your app/student-list/student-list.component.ts file and add below code into it:
import { Component, OnInit } from '@angular/core';
import { CrudService } from '../services/crud.service';  // CRUD API service class
import { ToastrService } from 'ngx-toastr';      // Alert message using NGX toastr

export interface Student {
    $key: string;
    firstName: string;
    lastName: string;
    email: string
    mobileNumber: Number;
 }
@Component({
  selector: 'app-student-list',
  templateUrl: './student-list.component.html',
  styleUrls: ['./student-list.component.css']
})

export class StudentListComponent implements OnInit {
  p: number = 1;                      // Settup up pagination variable
  Student: Student[];                 // Save students data in Student's array.
  hideWhenNoStudent: boolean = false; // Hide students data table when no student.
  noData: boolean = false;            // Showing No Student Message, when no student in database.


  constructor(
    public crudApi: CrudService, // Inject student CRUD services in constructor.
    public toastr: ToastrService // Toastr service for alert message
    ){ }


  ngOnInit() {
    this.dataState(); // Initialize student's list, when component is ready
    let s = this.crudApi.GetStudentsList();
    s.snapshotChanges().subscribe(data => { // Using snapshotChanges() method to retrieve list of data along with metadata($key)
      this.Student = [];
      data.forEach(item => {
        let a = item.payload.toJSON();
        a['$key'] = item.key;
        this.Student.push(a as Student);
      })
    })
  }

  // Using valueChanges() method to fetch simple list of students data. It updates the state of hideWhenNoStudent, noData variables when any changes occurs in student data list in real-time.
  dataState() {
    this.crudApi.GetStudentsList().valueChanges().subscribe(data => {

      if(data.length <= 0){
        this.hideWhenNoStudent = false;
        this.noData = true;
      } else {
        this.hideWhenNoStudent = true;
        this.noData = false;
      }
    })
  }

  // Method to delete student object
  deleteStudent(student) {
    if (window.confirm('Are sure you want to delete this student ?')) { // Asking from user before Deleting student data.
      this.crudApi.DeleteStudent(student.$key) // Using Delete student API to delete student.
      this.toastr.success(student.firstName + ' successfully deleted!'); // Alert message will show up when student successfully deleted.
    }
  }

}
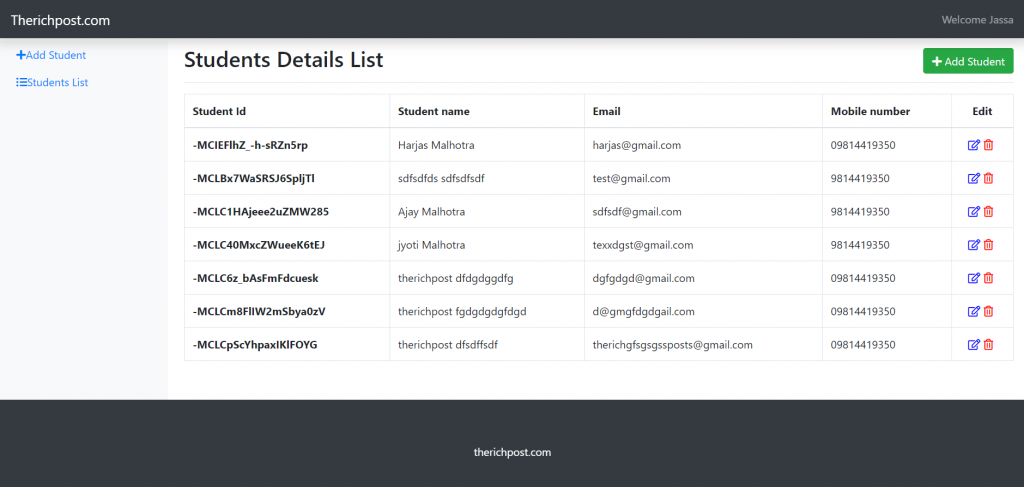
18. Now open your app/student-list/student-list.component.thtml s file and add below code into it:
<div class="d-flex justify-content-between flex-wrap flex-md-nowrap align-items-center pt-3 pb-2 mb-3 border-bottom">
    <h1 class="h2">Students List</h1>
    <!-- It won't show if there is no student data -->
    <a routerLink="/register-student" class="btn btn-success" *ngIf="hideWhenNoStudent">
      <i class="fas fa-plus custom-fa-plus"></i>
      Add Student
    </a>
  </div>

  <div class="pricing-header mx-auto">

    <!-- No data shows when their is no student data available -->
    <div class="no-data text-center" *ngIf="noData">

      <p class="nodata-msg">No student added yet!</p>
      <a routerLink="/register-student" class="btn btn-success">
        <i class="fas fa-plus custom-fa-plus"></i>
        Add Student
      </a>
    </div>

    <!-- Showing students data -->
    <div class="table-responsive" *ngIf="hideWhenNoStudent">
      <table class="table table-bordered table-responsive-sm table-responsive-md table-responsive-lg">
        <thead>
          <tr>
            <th scope="col">Student Id</th>
            <th scope="col">Student name</th>
            <th scope="col">Email</th>
            <th scope="col">Mobile number</th>
            <th class="text-center" scope="col">Edit</th>
          </tr>
        </thead>
        <tbody>
          <!-- *ngFor loop iterates over Student array and fetch the student's data -->
          <!-- paginate pipe will add pagination in student's list, it won't show if items are less then 7 -->
          <tr *ngFor="let student of Student | paginate: { itemsPerPage: 7, currentPage: p }; let i = index;">
            <th scope="row">{{student.$key}}</th>
            <td>{{student.firstName}} {{student.lastName}}</td>
            <td>{{student.email}}</td>
            <td>{{student.mobileNumber}}</td>
            <td class="text-center action-block">
              <!-- routerLink="/edit-student/{{student.$key}}" is refered to { path: 'edit-student/:id', component: EditStudentComponent } in app-routing.moudles.ts -->
              <i class="far fa-edit" routerLink="/edit-student/{{student.$key}}"></i>
              <i class="far fa-trash-alt" (click)="deleteStudent(student)"></i></td>
          </tr>
        </tbody>
      </table>
    </div>
    <!-- Pagination -->
    <pagination-controls (pageChange)="p = $event" autoHide="true" responsive="true"></pagination-controls>
  </div>
This is it and please run ng serve command check the working and if you have any kind of query then please do comment below.
I will appreciate that if you will tell your views for this post. Nothing matters if your views will be good or bad.
Thanks
Jassa
Leave a Reply