
Hello friends, welcome back to my blog. Today in this blog post, I am going to show you, Reactjs Admin Dashboard Template Simple and Free.
For reactjs new comers, please check the below link:
Friends now I proceed onwards and here is the working code snippet for Reactjs Admin Dashboard Template Simple and Free and please use this carefully to avoid the mistakes:
1. Firstly, we need fresh reactjs setup and for that, we need to run below commands into out terminal and also we should have latest node version installed on our system:
npx create-react-app reacttemplate

cd reacttemplate

npm start
2. Now we need to run below commands into our project terminal to get bootstrap and related modules into our reactjs application:
npm install bootstrap --save

npm install jquery --save

npm install popper.js

npm start //For start project again
3. Finally for the main output, we need to add below code into our reacttemplate/src/App.js file or if you have fresh setup then you can replace reacttemplate/src/App.js file code with below code:
import React from "react";
import './App.css'
import 'bootstrap/dist/css/bootstrap.min.css';
import 'bootstrap/dist/js/bootstrap.min.js';
class App extends React.Component {
render() {
return (
<div className="main_container">
<div id="wrapper" class="animate">
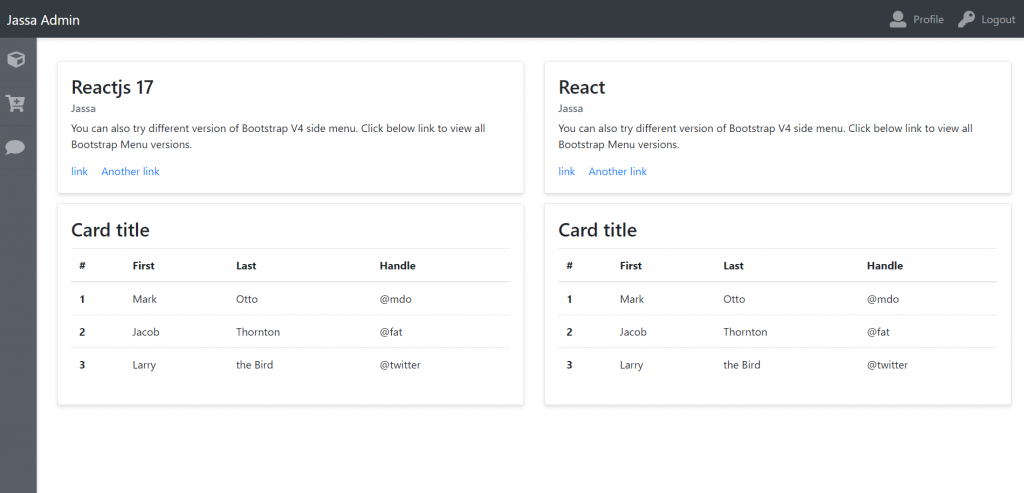
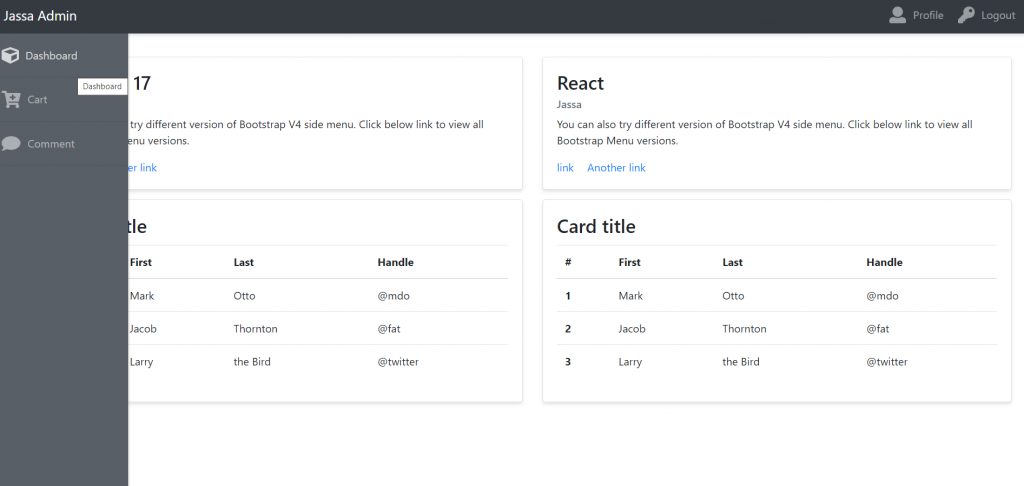
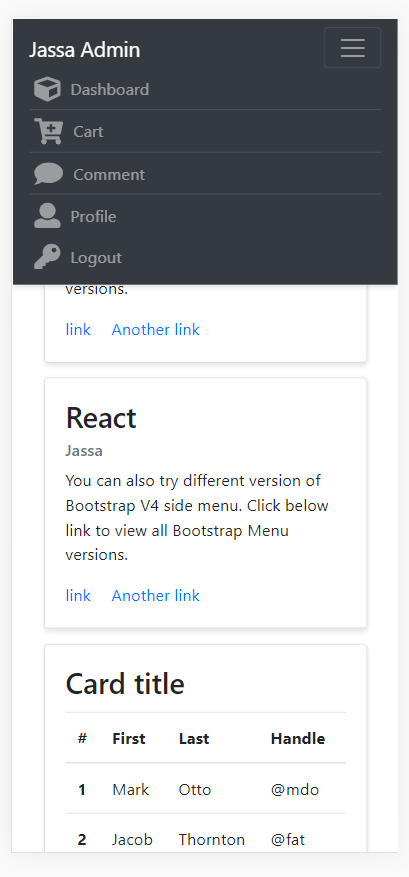
<nav class="navbar header-top fixed-top navbar-expand-lg navbar-dark bg-dark">
<a class="navbar-brand" href="#">Jassa Admin</a>
<button class="navbar-toggler" type="button" data-toggle="collapse" data-target="#navbarText" aria-controls="navbarText"
aria-expanded="false" aria-label="Toggle navigation">
<span class="navbar-toggler-icon"></span>
</button>
<div class="collapse navbar-collapse" id="navbarText">
<ul class="navbar-nav animate side-nav">
<li class="nav-item">
<a class="nav-link" href="#" title="Dashboard"><i class="fas fa-cube"></i> Dashboard <i class="fas fa-cube shortmenu animate"></i></a>
</li>
<li class="nav-item">
<a class="nav-link" href="#" title="Cart"><i class="fas fa-cart-plus"></i> Cart <i class="fas fa-cart-plus shortmenu animate"></i></a>
</li>
<li class="nav-item">
<a class="nav-link" href="#" title="Comment"><i class="fas fa-comment"></i> Comment <i class="fas fa-comment shortmenu animate"></i></a>
</li>
</ul>
<ul class="navbar-nav ml-md-auto d-md-flex">
<li class="nav-item">
<a class="nav-link" href="#"><i class="fas fa-user"></i> Profile</a>
</li>
<li class="nav-item">
<a class="nav-link" href="#"><i class="fas fa-key"></i> Logout</a>
</li>
</ul>
</div>
</nav>
<div class="container-fluid">
<div class="row">
<div class="col">
<div class="card">
<div class="card-body">
<h5 class="card-title">Reactjs 17</h5>
<h6 class="card-subtitle mb-2 text-muted">Jassa</h6>
<p class="card-text">You can also try different version of Bootstrap V4 side menu. Click below link to view all Bootstrap Menu versions.</p>
<a href="#" class="card-link">link</a>
<a href="#" class="card-link">Another link</a>
</div>
</div>
</div>
<div class="col">
<div class="card">
<div class="card-body">
<h5 class="card-title">React</h5>
<h6 class="card-subtitle mb-2 text-muted">Jassa</h6>
<p class="card-text">You can also try different version of Bootstrap V4 side menu. Click below link to view all Bootstrap Menu versions.</p>
<a href="#" class="card-link">link</a>
<a href="#" class="card-link">Another link</a>
</div>
</div>
</div>
</div>
<div class="row">
<div class="col">
<div class="card">
<div class="card-body">
<h5 class="card-title">Card title</h5>
<table class="table">
<thead>
<tr>
<th scope="col">#</th>
<th scope="col">First</th>
<th scope="col">Last</th>
<th scope="col">Handle</th>
</tr>
</thead>
<tbody>
<tr>
<th scope="row">1</th>
<td>Mark</td>
<td>Otto</td>
<td>@mdo</td>
</tr>
<tr>
<th scope="row">2</th>
<td>Jacob</td>
<td>Thornton</td>
<td>@fat</td>
</tr>
<tr>
<th scope="row">3</th>
<td>Larry</td>
<td>the Bird</td>
<td>@twitter</td>
</tr>
</tbody>
</table>
</div>
</div>
</div>
</div>
</div>
</div>
</div>
);
}
}
export default App;
4. Now friends, we need to below code into our reacttemplate/src/App.css file for some custom styling:
body{background:#f9f9f9;}
#wrapper{padding:90px 15px;}
.navbar-expand-lg .navbar-nav.side-nav{flex-direction: column;}
.card{margin-bottom: 15px; border-radius:0; box-shadow: 0 3px 5px rgba(0,0,0,.1); }
.header-top{box-shadow: 0 3px 5px rgba(0,0,0,.1)}
.leftmenutrigger, .navbar-nav li a .shortmenu{display: none}
.card-title{ font-size: 28px}
@media(min-width:992px) {
#wrapper{padding: 90px 15px 15px 75px; }
.navbar-nav.side-nav:hover {left:0;}
.side-nav li a {padding: 20px}
.navbar-nav li a .shortmenu {float: right;display: block;opacity: 1}
.navbar-nav.side-nav:hover li a .shortmenu{opacity: 0}
.navbar-nav.side-nav{background: #585f66;box-shadow: 2px 1px 2px rgba(0,0,0,.1);position:fixed;top:56px;flex-direction: column!important;left:-140px;width:200px;overflow-y:auto;bottom:0;overflow-x:hidden;padding-bottom:40px}
}
.animate{-webkit-transition:all .2s ease-in-out;-moz-transition:all .2s ease-in-out;-o-transition:all .2s ease-in-out;-ms-transition:all .2s ease-in-out;transition:all .2s ease-in-out}
.navbar-nav li a svg{font-size: 25px;float: left;margin: 0 10px 0 5px;}
.side-nav li { border-bottom: 1px solid #50575d;}
5. Now friends, we need to below code into our reacttemplate/public/index.html file for font awesome icons:
...
  <head>
    ...
    <script defer src="https://use.fontawesome.com/releases/v5.0.6/js/all.js"></script>


  </head>
Now we are done friends. If you have any kind of query or suggestion or any requirement then feel free to comment below.
Note: Friends, I just tell the basic setup and things, you can change the code according to your requirements.
I will appreciate that if you will tell your views for this post. Nothing matters if your views will be good or bad.
Jassa
Thanks
Leave a Reply