
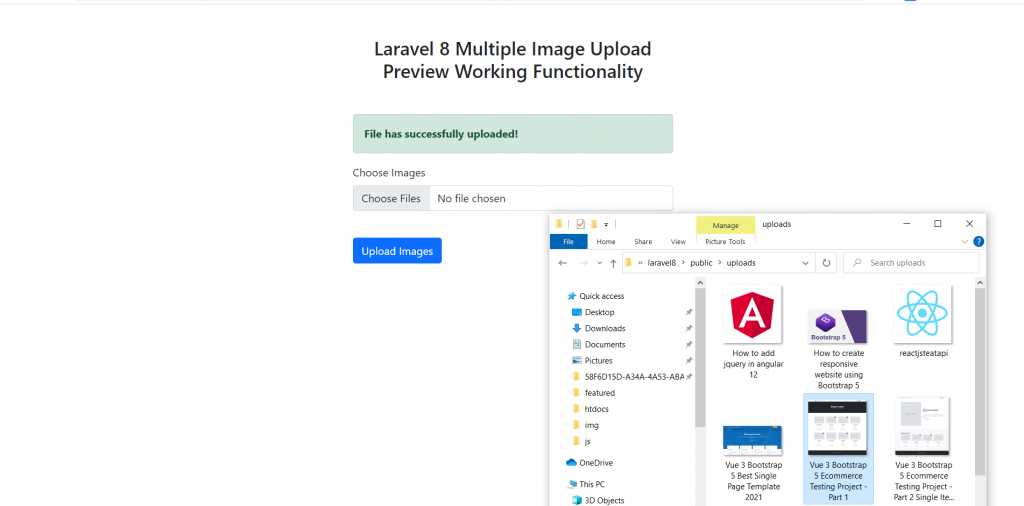
Hello guy’s welcome back to my blog. Today in this blog post we will do, Laravel 8 Multiple Image Upload Preview Save inside Folder Working Functionality.
Guys if you are new in Laravel 8 the please check below links:
Guy’s here is the working code snippet and please use carefully:
1. Guy’s very first please create file `image-upload.blade.php` inside projectname/resources/views folder and add below code:
<!doctype html>
<html lang="en">

<head>
    <meta charset="utf-8">
    <meta name="viewport" content="width=device-width, initial-scale=1, shrink-to-fit=no">
    <link href="https://cdn.jsdelivr.net/npm/bootstrap@5.0.2/dist/css/bootstrap.min.css" rel="stylesheet">

    <title>Laravel Image Upload</title>
    <style>

        .imgPreview img {
            padding: 8px;
            max-width: 100px;
        }
    </style>
</head>

<body>

    <div class="container mt-5">
        <h3 class="text-center mb-5">Laravel 8 Multiple Image Upload Preview Working Functionality</h3>
        <form action="{{route('imageUpload')}}" method="post" enctype="multipart/form-data">
            @csrf
            @if ($message = Session::get('success'))
                <div class="alert alert-success">
                    <strong>{{ $message }}</strong>
                </div>
            @endif

            @if (count($errors) > 0)
                <div class="alert alert-danger">
                    <ul>
                        @foreach ($errors->all() as $error)
                        <li>{{ $error }}</li>
                        @endforeach
                    </ul>
                </div>
            @endif

            <div class="user-image mb-3 text-center">
                <div class="imgPreview"> </div>
            </div>
            <div class="mb-3">
                <label for="exampleFormControlInput1" class="form-label">Choose Images</label>
                <input type="file" class="form-control" name="imageFile[]" id="images" multiple="multiple">
                </div>


            <button type="submit" name="submit" class="btn btn-primary mt-4">
                Upload Images
            </button>
        </form>
    </div>

    <!-- jQuery -->
    <script src="https://code.jquery.com/jquery-3.5.1.slim.min.js"></script>
    <script>
        $(function() {
        // Multiple images preview with JavaScript
        var multiImgPreview = function(input, imgPreviewPlaceholder) {

            if (input.files) {
                var filesAmount = input.files.length;

                for (i = 0; i < filesAmount; i++) {
                    var reader = new FileReader();

                    reader.onload = function(event) {
                        $($.parseHTML('<img>')).attr('src', event.target.result).appendTo(imgPreviewPlaceholder);
                    }

                    reader.readAsDataURL(input.files[i]);
                }
            }

        };

        $('#images').on('change', function() {
            multiImgPreview(this, 'div.imgPreview');
        });
        });
    </script>
</body>
</html>
2. Guy’s now add below code inside projectname/routes/web.php file for routing:
...
Route::get('/image-upload', [App\Http\Controllers\HomeController::class, 'createForm']);
Route::post('/image-upload', [App\Http\Controllers\HomeController::class, 'fileUpload'])->name('imageUpload');
...
3. Guy’s now add below code inside projectname/app/Http/Controllers/HomeController.php file to call the save folder functionality:
<?php

...

class HomeController extends Controller
{
     ...
      public function createForm(){
        return view('image-upload');
      }

      public function fileUpload(Request $req){
        $req->validate([
          'imageFile' => 'required',
          'imageFile.*' => 'mimes:jpeg,jpg,png,gif,csv,txt,pdf|max:2048'
        ]);

        if($req->hasfile('imageFile')) {
            foreach($req->file('imageFile') as $file)
            {
                $name = $file->getClientOriginalName();
                $file->move(public_path().'/uploads/', $name);
                $imgData[] = $name;
            }

           return back()->with('success', 'File has successfully uploaded!');
        }
      }

}
4. Guy’s in the end we need to create `uploads` folder inside projectname/public folder to save the uploaded files.
Guy’s now we are done and please run php artisan serve command in your Laravel 8 project and see the working(http://127.0.0.1:8000/image-upload) .
Friends If you have any kind of query or suggestion or any requirement then feel free to comment below.
Note: Friends, I just tell the basic setup and things, you can change the code according to your requirements. For better understanding must watch video above.
I will appreciate that if you will tell your views for this post. Nothing matters if your views will be good or bad.
Jassa
Thanks.
Leave a Reply