
Generating a custom authentication token in an Angular application typically involves integrating a backend service where the actual token generation happens. Angular, as a frontend framework, doesn’t generate tokens directly but can send and receive them to and from a backend service like a Node.js/Express server. Here’s a broad approach to doing this with Angular 17:
Step 1: Set Up Your Backend
- Create an API endpoint for authentication: This endpoint will handle user credentials and generate a token. For example, you can use JWT (JSON Web Tokens) with a library like
jsonwebtokenin Node.js. Example Node.js endpoint using Express:
   const express = require('express');
   const jwt = require('jsonwebtoken');
   const app = express();
   app.use(express.json());

   app.post('/api/login', (req, res) => {
       const { username, password } = req.body;
       // Validate credentials
       // Normally, you'd validate against a database
       if (username === 'admin' && password === 'password') {
           const token = jwt.sign({ username }, 'your_secret_key', { expiresIn: '1h' });
           return res.json({ token });
       } else {
           return res.status(401).send('Credentials are incorrect');
       }
   });

   app.listen(3000, () => console.log('Server running on port 3000'));
Step 2: Set Up Angular to Handle Authentication
- Create an Angular Service for Authentication:
- This service will make HTTP requests to your backend for token generation.
- Use Angular’s
HttpClientmodule.
   import { Injectable } from '@angular/core';
   import { HttpClient } from '@angular/common/http';
   import { Observable } from 'rxjs';

   @Injectable({
       providedIn: 'root'
   })
   export class AuthService {
       private apiUrl = 'http://localhost:3000/api/login';

       constructor(private http: HttpClient) {}

       login(username: string, password: string): Observable<any> {
           return this.http.post(this.apiUrl, {username, password});
       }
   }
- Connect the Service to a Component:
- Use this service in a component to send the login request.
import { Component } from '@angular/core';
import { CommonModule } from '@angular/common';
import { RouterOutlet } from '@angular/router';
import { HttpClientModule } from '@angular/common/http';
import { FormsModule } from '@angular/forms';
import { AuthService } from './auth.service';
@Component({
selector: 'app-root',
standalone: true,
imports: [CommonModule, RouterOutlet, HttpClientModule, FormsModule],
templateUrl: './app.component.html',
styleUrl: './app.component.css'
})
export class AppComponent {
title = 'angularecommerce';
username!: string;
password!: string;
constructor(private authService: AuthService) {}
login(): void {
this.authService.login(this.username, this.password).subscribe({
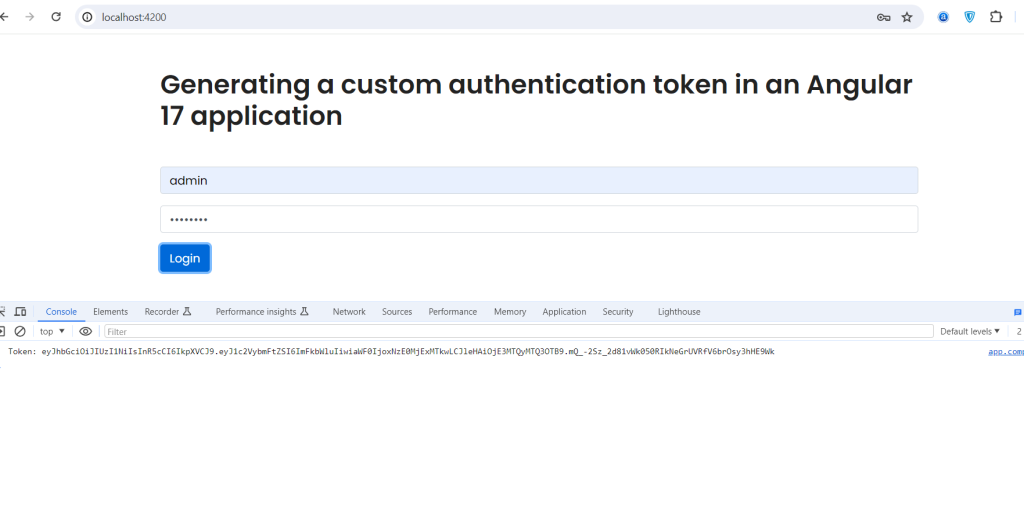
next: (response) => {
console.log('Token:', response.token);
// Store token in local storage or handle as needed
},
error: (error) => {
console.error('Error:', error);
}
});
}
}
- Handle the Token in Angular:
- Store the token in local storage or in a service to maintain the session.
- Use Angular interceptors to attach the token to subsequent requests.
- 4. Component html code:
<div class="container p-5">
    <div class="row g-3">
        <div class="col-auto input-group mb-3">
            <input class="form-control" type="text" [(ngModel)]="username" placeholder="Username">
        </div>
        <div class="col-auto input-group mb-3">
            <input class="form-control" type="password" [(ngModel)]="password" placeholder="Password">
        </div>

        <div class="col-auto">
            <button class="btn btn-primary" (click)="login()">Login</button>
        </div>

    </div>

</div>
This is a simplified overview, and actual implementations can vary based on security requirements and additional features like token refresh, error handling, and user roles. Always ensure that your token generation and handling are secure to prevent vulnerabilities in your application.
Jassa
Thanks
Leave a Reply