
Hello guys how are you? Welcome back to my blog. Today in this blog post I will show you Creating beautiful Single Product Page using Next.js Tailwind Css Slick Carousel.
For react js new comers, please check the below links:
Guys here is the code snippet and please use carefully:
Step 1: Create a New Next.js Project
If you haven’t already, create a new Next.js project:
npx create-next-app@latest my-ecommerce-demo
cd my-ecommerce-demo
Step 2: Install Necessary Dependencies
Install the necessary dependencies. For this example, we’ll use react-slick slider, a popular library for creating ecommerce websites product slider.
npm install react-slick slick-carousel
Step 3: Apply Tailwind CSS Styles
Add some custom styles for the single product page component in your globals.css or directly in a component file if you are using module-based styling.
@tailwind base;
@tailwind components;
@tailwind utilities;

@import "~slick-carousel/slick/slick.css";
@import "~slick-carousel/slick/slick-theme.css";


:root {
  --foreground-rgb: 0, 0, 0;
  --background-start-rgb: 214, 219, 220;
  --background-end-rgb: 255, 255, 255;
}

@media (prefers-color-scheme: dark) {
  :root {
    --foreground-rgb: 255, 255, 255;
    --background-start-rgb: 0, 0, 0;
    --background-end-rgb: 0, 0, 0;
  }
}

body {
  color: rgb(var(--foreground-rgb));
  background: linear-gradient(
      to bottom,
      transparent,
      rgb(var(--background-end-rgb))
    )
    rgb(var(--background-start-rgb));
}

@layer utilities {
  .text-balance {
    text-wrap: balance;
  }
}
/* global.css */
.slick-dots
{
  position: relative;
  top: 0;
}
Step 4: Update code in a Page.js inside src/app folder and also please add the images (public/images)
Open the page.js file and replace the content with the following code .
"use client"
import Image from 'next/image';
import Slider from 'react-slick';
import { useState } from 'react';
export default function Home() {
const [activeTab, setActiveTab] = useState('description');
const settings = {
dots: true,
infinite: true,
speed: 500,
slidesToShow: 1,
slidesToScroll: 1,
};
const productImages = [
"/images/0.jpeg",
"/images/1.jpeg",
"/images/4.jpeg",
];
const relatedProducts = [
{ title: "Related Product 1", price: "$39.99", image: "/images/0.jpeg" },
{ title: "Related Product 2", price: "$29.99", image: "/images/1.jpeg" },
{ title: "Related Product 3", price: "$19.99", image: "/images/4.jpeg" },
];
return (
<div className="min-h-screen bg-gray-50 flex flex-col">
{/* Header */}
<header className="bg-white shadow-md">
<div className="max-w-7xl mx-auto px-4 py-6 sm:px-6 lg:px-8">
<div className="flex justify-between items-center">
<div className="text-2xl font-bold text-indigo-600">MyShop</div>
<nav>
<ul className="flex space-x-4">
<li><a href="/" className="text-gray-700 hover:text-indigo-500">Home</a></li>
<li><a href="/shop" className="text-gray-700 hover:text-indigo-500">Shop</a></li>
<li><a href="/about" className="text-gray-700 hover:text-indigo-500">About</a></li>
<li><a href="/contact" className="text-gray-700 hover:text-indigo-500">Contact</a></li>
</ul>
</nav>
</div>
</div>
</header>
{/* Main Content */}
<main className="flex-grow">
<div className="max-w-7xl mx-auto bg-white rounded-xl shadow-md overflow-hidden mt-6 flex flex-col lg:flex-row">
{/* Product Slider (Left Side) */}
<div className="lg:w-1/2">
<Slider {...settings} className="product-slider">
{productImages.map((src, index) => (
<div key={index} className="relative h-96 ">
<Image src={src} alt={`Product Image ${index + 1}`} layout="fill" objectFit="cover" />
</div>
))}
</Slider>
</div>
{/* Product Information (Right Side) */}
<div className="p-8 lg:w-1/2">
<div className="uppercase tracking-wide text-sm text-indigo-500 font-semibold">
Product Category
</div>
<h1 className="block mt-1 text-2xl leading-tight font-medium text-black">
Product Title
</h1>
<p className="mt-4 text-gray-500">
This is a brief description of the product.
</p>
<div className="mt-4">
<span className="text-2xl font-semibold text-black">$49.99</span>
</div>
<button className="mt-6 bg-indigo-500 text-white px-6 py-2 rounded-md hover:bg-indigo-600 transition-all">
Add to Cart
</button>
{/* Tabs for Product Details */}
<div className="mt-8">
<div className="flex space-x-4 border-b-2 border-gray-200">
<button
className={`pb-2 ${activeTab === 'description' ? 'border-b-2 border-indigo-500 text-indigo-500' : ''}`}
onClick={() => setActiveTab('description')}
>
Description
</button>
<button
className={`pb-2 ${activeTab === 'reviews' ? 'border-b-2 border-indigo-500 text-indigo-500' : ''}`}
onClick={() => setActiveTab('reviews')}
>
Reviews
</button>
<button
className={`pb-2 ${activeTab === 'specifications' ? 'border-b-2 border-indigo-500 text-indigo-500' : ''}`}
onClick={() => setActiveTab('specifications')}
>
Specifications
</button>
</div>
<div className="mt-4">
{activeTab === 'description' && (
<p className="text-gray-700">
Detailed description of the product.
</p>
)}
{activeTab === 'reviews' && (
<p className="text-gray-700">
Customer reviews will go here.
</p>
)}
{activeTab === 'specifications' && (
<p className="text-gray-700">
Product specifications.
</p>
)}
</div>
</div>
</div>
</div>
{/* Related Products */}
<div className="p-8 bg-gray-100 mt-6">
<h2 className="text-xl font-semibold text-gray-800">Related Products</h2>
<div className="mt-4 grid grid-cols-1 sm:grid-cols-2 lg:grid-cols-3 gap-4">
{relatedProducts.map((product, index) => (
<div key={index} className="bg-white rounded-md shadow p-4">
<div className="relative h-48 mb-4">
<Image src={product.image} alt={product.title} layout="fill" objectFit="cover" />
</div>
<h3 className="text-lg font-medium text-gray-900">{product.title}</h3>
<p className="mt-2 text-gray-600">{product.price}</p>
<button className="mt-4 bg-indigo-500 text-white px-4 py-2 rounded-md hover:bg-indigo-600 transition-all">
View Product
</button>
</div>
))}
</div>
</div>
</main>
{/* Footer */}
<footer className="bg-gray-800 text-white py-6 mt-6">
<div className="max-w-7xl mx-auto px-4 sm:px-6 lg:px-8">
<div className="flex justify-between items-center">
<div>© 2024 MyShop. All rights reserved.</div>
<div>
<ul className="flex space-x-4">
<li><a href="/privacy" className="hover:underline">Privacy Policy</a></li>
<li><a href="/terms" className="hover:underline">Terms of Service</a></li>
</ul>
</div>
</div>
</div>
</footer>
</div>
);
}
Step 5: Run the Application
Finally, run your Next.js application:
npm run dev
Visit http://localhost:3000 in your browser to see the website in action.
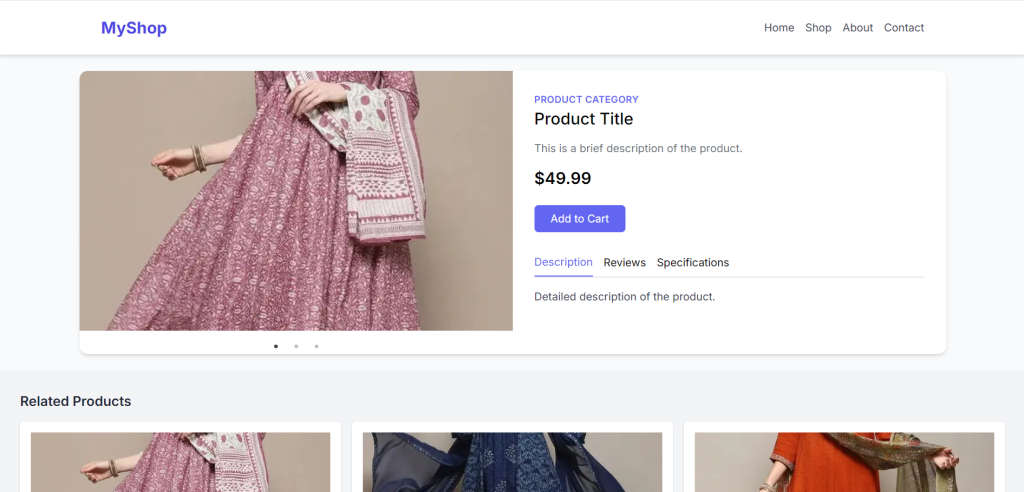
This setup provides a simple ecommerce product page styled with Tailwind CSS, integrated into a Next.js application.
This is it guys and if you will have any kind of query, suggestion or requirement then feel free to comment below. Also if you will have any kind of project then feel free to hire me
Thanks
Ajay
Leave a Reply
You must be logged in to post a comment.