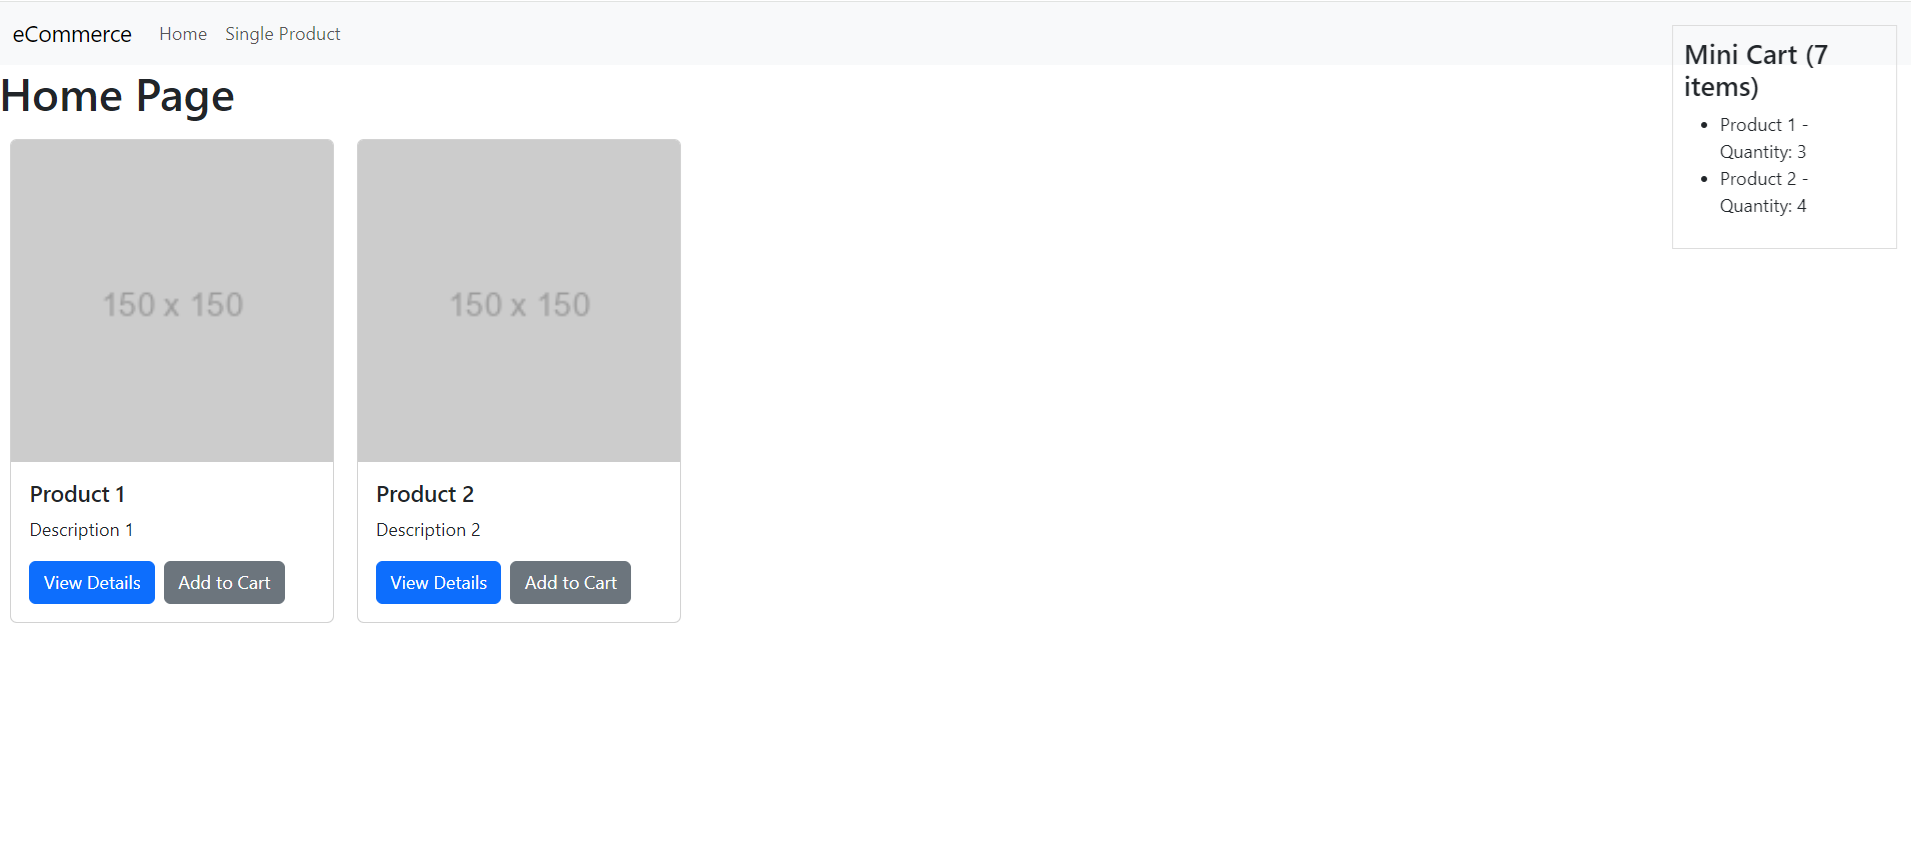
Hello guys how are you? Welcome back to my blog. Today in this post I am creating an eCommerce website in Vue.js 3 using Bootstrap 5. We’ll include a mini cart, a product details page, and a single product page.
Key Features:
- Vuejs 3
- Bootstrap 5
- State Management
- Mini Cart Functionality
- Single Product Page
- Products Listing Page
- Fully Responsive
- Routing
Vue 3 came and if you are new then you must check below link:
Friends now I proceed onwards and here is the working code snippet for Creating an Ecommerce Website in Vue js 3 using Bootstrap and please use this carefully to avoid the mistakes:
Step 1: Set Up the Vue.js Project
First, ensure you have Vue CLI installed. If not, you can install it using npm:
npm install -g @vue/cli
Now, create a new Vue project:
vue create ecommerce-app
cd ecommerce-app
Step 2: Install Bootstrap 5
To use Bootstrap 5, install it via npm:
npm install bootstrap
Then, include Bootstrap in your main.js:
import { createApp } from 'vue';
import App from './App.vue';
import 'bootstrap/dist/css/bootstrap.min.css';

createApp(App).mount('#app');
Step 3: Create the Project Structure
Let’s create the necessary components and views for the eCommerce site.
- Components
MiniCart.vueProductCard.vue
- Views
Home.vueProductDetails.vueSingleProduct.vue
- router
- index.js
- store
- cart.js
Step 4: Define Routes
Install Vue Router if you haven’t already:
npm install vue-router@next
Then, set up the routes in src/router/index.js:
import { createRouter, createWebHistory } from 'vue-router';
import Home from '../views/Home.vue';
import ProductDetails from '../views/ProductDetails.vue';
import SingleProduct from '../views/SingleProduct.vue';

const routes = [
  {
    path: '/',
    name: 'Home',
    component: Home
  },
  {
    path: '/product/:id',
    name: 'ProductDetails',
    component: ProductDetails
  },
  {
    path: '/single-product',
    name: 'SingleProduct',
    component: SingleProduct
  }
];

const router = createRouter({
  history: createWebHistory(process.env.BASE_URL),
  routes
});

export default router;
In your main.js, include the router:
import { createApp } from 'vue';
import App from './App.vue';
import router from './router';
import 'bootstrap/dist/css/bootstrap.min.css';

createApp(App).use(router).mount('#app');
Step 5: Create Components
MiniCart.vue
<template>
  <div class="mini-cart">
    <h4>Mini Cart ({{ totalItems }} items)</h4>
    <ul>
      <li v-for="item in cartItems" :key="item.id">
        {{ item.name }} - Quantity: {{ item.quantity }}
      </li>
    </ul>
  </div>
</template>

<script>
import { computed } from 'vue';
import { cart } from '../store/cart';

export default {
  setup() {
    const cartItems = computed(() => cart.items);
    const totalItems = computed(() => cart.totalItems);
    return {
      cartItems,
      totalItems
    };
  }
};
</script>

<style scoped>
.mini-cart {
  position: fixed;
  top: 20px;
  right: 20px;
  width: 200px;
  border: 1px solid #ddd;
  padding: 10px;
}
</style>
ProductCard.vue
<template>
  <div class="card" style="width: 18rem;">
    <img src="https://via.placeholder.com/150" class="card-img-top" :alt="product.name">
    <div class="card-body">
      <h5 class="card-title">{{ product.name }}</h5>
      <p class="card-text">{{ product.description }}</p>
      <router-link :to="`/product/${product.id}`" class="btn btn-primary me-2">View Details</router-link>
      <button class="btn btn-secondary" @click="$emit('add-to-cart', product)">Add to Cart</button>
    </div>
  </div>
</template>

<script>
export default {
  props: {
    product: Object
  }
};
</script>

<style scoped>
.card {
  margin: 10px;
}
</style>
Step 6: Create Views
Home.vue
<template>
  <div class="home">
    <h1>Home Page</h1>
    <div class="product-list">
      <ProductCard v-for="product in products" :key="product.id" :product="product" @add-to-cart="addToCart" />
    </div>
    <MiniCart />
  </div>
</template>

<script>
import ProductCard from '../components/ProductCard.vue';
import MiniCart from '../components/MiniCart.vue';
import { cart } from '../store/cart';

export default {
  components: {
    ProductCard,
    MiniCart
  },
  data() {
    return {
      products: [
        { id: 1, name: 'Product 1', description: 'Description 1', image: 'https://via.placeholder.com/150' },
        { id: 2, name: 'Product 2', description: 'Description 2', image: 'https://via.placeholder.com/150' },
        // Add more products as needed
      ]
    };
  },
  methods: {
    addToCart(product) {
      cart.addToCart(product);
    }
  }
};
</script>

<style scoped>
.product-list {
  display: flex;
  flex-wrap: wrap;
}
</style>
ProductDetails.vue
<template>
  <div class="product-details">
    <h1>{{ product.name }}</h1>
    <img src="https://via.placeholder.com/150" :alt="product.name">
    <p>{{ product.description }}</p>
    <button class="btn btn-primary" @click="addToCart(product)">Add to Cart</button>
  </div>
</template>

<script>
import { cart } from '../store/cart';

export default {
  data() {
    return {
      product: {}
    };
  },
  created() {
    const productId = this.$route.params.id;
    // Fetch product details based on productId
    // For demonstration, we'll use a static product
    this.product = { id: productId, name: 'Product ' + productId, description: 'Description ' + productId, image: 'image' + productId + '.jpg' };
  },
  methods: {
    addToCart(product) {
      cart.addToCart(product);
    }
  }
};
</script>

<style scoped>
.product-details {
  text-align: center;
}
</style>
SingleProduct.vue
<template>
  <div class="single-product">
    <h1>Single Product Page</h1>
    <ProductCard :product="product" @add-to-cart="addToCart" />
  </div>
</template>

<script>
import ProductCard from '../components/ProductCard.vue';
import { cart } from '../store/cart';

export default {
  components: {
    ProductCard
  },
  data() {
    return {
      product: { id: 1, name: 'Single Product', description: 'Single Product Description', image: 'single-product.jpg' }
    };
  },
  methods: {
    addToCart(product) {
      cart.addToCart(product);
    }
  }
};
</script>

<style scoped>
.single-product {
  text-align: center;
}
</style>
Step 7: Set Up a Global State Management Solution
src/store/cart.js:
import { reactive, computed } from 'vue';

const state = reactive({
  items: []
});

export const cart = {
  get items() {
    return state.items;
  },

  addToCart(product) {
    const item = state.items.find(item => item.id === product.id);
    if (item) {
      item.quantity++;
    } else {
      state.items.push({ ...product, quantity: 1 });
    }
  },

  totalItems: computed(() => {
    return state.items.reduce((acc, item) => acc + item.quantity, 0);
  })
};
We’ll create a simple global state management for our cart using Vue’s reactive API.
App.vue file code:
<template>
  <div id="app">
    <nav class="navbar navbar-expand-lg navbar-light bg-light">
      <div class="container-fluid">
        <a class="navbar-brand" href="#">eCommerce</a>
        <button class="navbar-toggler" type="button" data-bs-toggle="collapse" data-bs-target="#navbarNav" aria-controls="navbarNav" aria-expanded="false" aria-label="Toggle navigation">
          <span class="navbar-toggler-icon"></span>
        </button>
        <div class="collapse navbar-collapse" id="navbarNav">
          <ul class="navbar-nav">
            <li class="nav-item">
              <router-link class="nav-link" to="/">Home</router-link>
            </li>
            <li class="nav-item">
              <router-link class="nav-link" to="/single-product">Single Product</router-link>
            </li>
          </ul>
        </div>
      </div>
    </nav>
    <router-view></router-view>
  </div>
</template>

<script>
export default {
  name: 'App'
};
</script>
Step 8: Run the Application
Run your application again to see the mini cart functionality in action:
npm run serve
Your Vue.js eCommerce website with a mini cart, product details page, and single product page should now be up and running!
Note: Friends, I just tell the basic setup and things, you can change the code according to your requirements. For better understanding must watch video above.
I will appreciate that if you will tell your views for this post. Nothing matters if your views will be good or bad.
Jassa
Thanks

Leave a Reply
You must be logged in to post a comment.