
Hello my friends, welcome back to my blog. Today in this blog post, I am going to show you, Vue 3 Animated Login & Registration Forms.
Vue 3 came and if you are new then you must check below link::
Vuejs
Friends now I proceed onwards and here is the working code snippet for Vue 3 Animated Login & Registration Forms and please use this carefully to avoid the mistakes:
1. Firstly friends we need fresh vuejs(Vue 3) setup and for that we need to run below commands into our terminal and also w should have latest node version installed on our system:
Guys you can skip this first step if you already have vuejs fresh setup:
npm install -g @vue/cli

vue create vuepage

cd vuepage

npm install bootstrap --save

npm i jquery --save

npm run serve //http://localhost:8080/
2. Now friends please create new file “App.css” inside src folder and add below code inside it:
@import url('https://fonts.googleapis.com/css?family=Mukta');
body{
  font-family: 'Mukta', sans-serif;
  height:100vh;
  min-height:550px;
  background-color: #b9fab9!important;
  background-repeat: no-repeat;
  background-size:cover;
  background-position:center;
  position:relative;
    overflow-y: hidden;
}
a{
  text-decoration:none;
  color:#444444;
}
.login-reg-panel{
    position: absolute;
    top: 50%;
    transform: translateY(-50%);
  text-align:center;
    width:70%;
  right:0;left:0;
    margin:auto;
    height:400px;
    background-color: rgba(236, 48, 20, 0.9);
}
.white-panel{
    background-color: rgba(255,255, 255, 1);
    height:500px;
    position:absolute;
    top:-50px;
    width:50%;
    right:calc(50% - 50px);
    transition:.3s ease-in-out;
    z-index:0;
    box-shadow: 0 0 15px 9px #00000096;
}
.login-reg-panel input[type="radio"]{
    position:relative;
    display:none;
}
.login-reg-panel{
    color:#B8B8B8;
}
.login-reg-panel #label-login,
.login-reg-panel #label-register{
    border:1px solid #9E9E9E;
    padding:5px 5px;
    width:150px;
    display:block;
    text-align:center;
    border-radius:10px;
    cursor:pointer;
    font-weight: 600;
    font-size: 18px;
}
.login-info-box{
    width:30%;
    padding:0 50px;
    top:20%;
    left:0;
    position:absolute;
    text-align:left;
}
.register-info-box{
    width:30%;
    padding:0 50px;
    top:20%;
    right:0;
    position:absolute;
    text-align:left;

}
.right-log{right:50px !important;}

.login-show,
.register-show{
    z-index: 1;
    display:none;
    opacity:0;
    transition:0.3s ease-in-out;
    color:#242424;
    text-align:left;
    padding:50px;
}
.show-log-panel{
    display:block;
    opacity:0.9;
}
.login-show input[type="text"], .login-show input[type="password"]{
    width: 100%;
    display: block;
    margin:20px 0;
    padding: 15px;
    border: 1px solid #b5b5b5;
    outline: none;
}
.login-show input[type="button"] {
    max-width: 150px;
    width: 100%;
    background: #444444;
    color: #f9f9f9;
    border: none;
    padding: 10px;
    text-transform: uppercase;
    border-radius: 2px;
    float:right;
    cursor:pointer;
}
.login-show a{
    display:inline-block;
    padding:10px 0;
}

.register-show input[type="text"], .register-show input[type="password"]{
    width: 100%;
    display: block;
    margin:20px 0;
    padding: 15px;
    border: 1px solid #b5b5b5;
    outline: none;
}
.register-show input[type="button"] {
    max-width: 150px;
    width: 100%;
    background: #444444;
    color: #f9f9f9;
    border: none;
    padding: 10px;
    text-transform: uppercase;
    border-radius: 2px;
    float:right;
    cursor:pointer;
}
.credit {
    position:absolute;
    bottom:10px;
    left:10px;
    color: #3B3B25;
    margin: 0;
    padding: 0;
    font-family: Arial,sans-serif;
    text-transform: uppercase;
    font-size: 12px;
    font-weight: bold;
    letter-spacing: 1px;
    z-index: 99;
}
a{
  text-decoration:none;
  color:#2c7715;
}
3. Finally friends we need to add below code into our src/App.vue file to get final output on web browser:
<template>
<div class="login-reg-panel">
<div class="login-info-box">
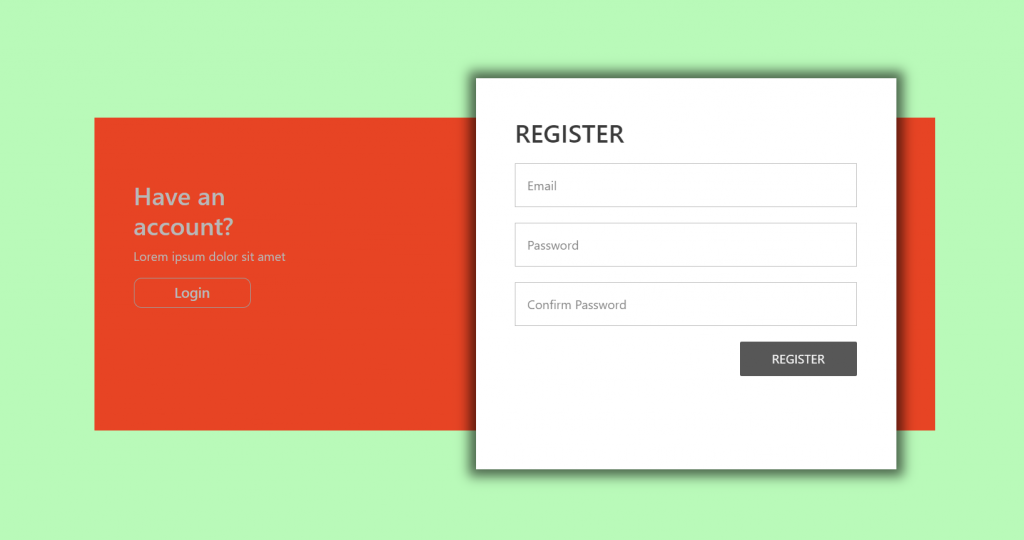
<h2>Have an account?</h2>
<p>Lorem ipsum dolor sit amet</p>
<label id="label-register" for="log-reg-show">Login</label>
<input type="radio" name="active-log-panel" id="log-reg-show" checked="checked">
</div>
<div class="register-info-box">
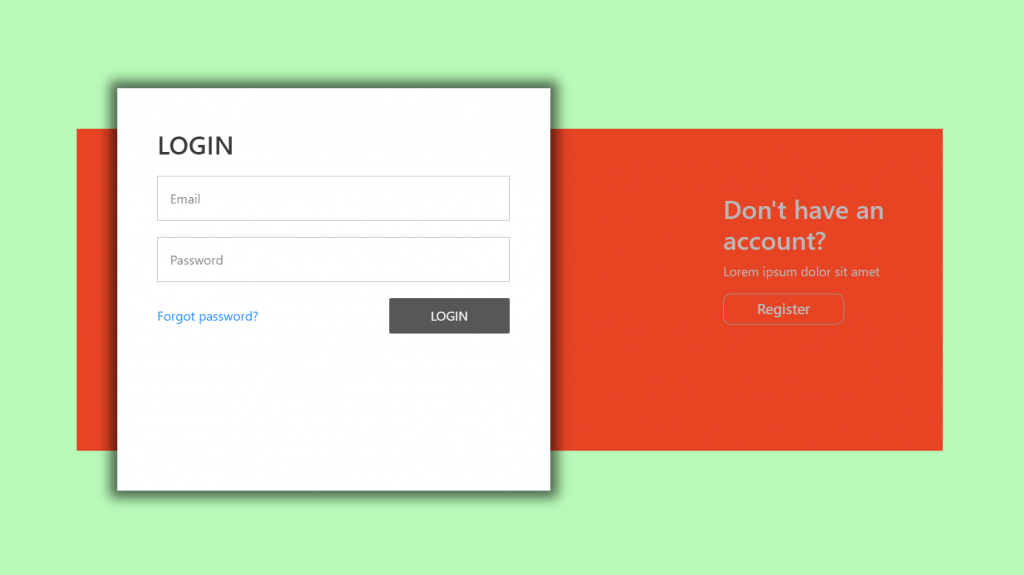
<h2>Don't have an account?</h2>
<p>Lorem ipsum dolor sit amet</p>
<label id="label-login" for="log-login-show">Register</label>
<input type="radio" name="active-log-panel" id="log-login-show">
</div>
<div class="white-panel">
<div class="login-show">
<h2>LOGIN</h2>
<input type="text" placeholder="Email">
<input type="password" placeholder="Password">
<input type="button" value="Login">
</div>
<div class="register-show">
<h2>REGISTER</h2>
<input type="text" placeholder="Email">
<input type="password" placeholder="Password">
<input type="password" placeholder="Confirm Password">
<input type="button" value="Register">
</div>
</div>
</div>
</template>
<script>
//Bootstrap
import './App.css';
import 'bootstrap/dist/css/bootstrap.min.css';
import 'bootstrap/dist/js/bootstrap.min.js';
import 'jquery/dist/jquery.min.js';
import $ from 'jquery';
export default {
//
mounted(){
//Animated Code
$(document).ready(function(){
$('.login-info-box').fadeOut();
$('.login-show').addClass('show-log-panel');
});
$('.login-reg-panel input[type="radio"]').on('change', function() {
if($('#log-login-show').is(':checked')) {
$('.register-info-box').fadeOut();
$('.login-info-box').fadeIn();
$('.white-panel').addClass('right-log');
$('.register-show').addClass('show-log-panel');
$('.login-show').removeClass('show-log-panel');
}
else if($('#log-reg-show').is(':checked')) {
$('.register-info-box').fadeIn();
$('.login-info-box').fadeOut();
$('.white-panel').removeClass('right-log');
$('.login-show').addClass('show-log-panel');
$('.register-show').removeClass('show-log-panel');
}
});
},
}
</script>
Now we are done friends also and If you have any kind of query or suggestion or any requirement then feel free to comment below.
Note: Friends, I just tell the basic setup and things, you can change the code according to your requirements. For better understanding must watch video above.
I will appreciate that if you will tell your views for this post. Nothing matters if your views will be good or bad.
Jassa
Thanks
Leave a Reply